help_outline Skip to main content

6.3

The rebuild starts !
pjtigger
He's a few of the things i've found on the car so far [:)]

Someones idea of a good panel fit !!


At some time in the past someone thought flashband (a stick roof repair product) was good for repairs to hide this (have a big pile of nice new Mercedes parts to fix this)


The quality of the welding between the rear firewall & seat pan could be better !! - does anyone have a photo showing how the factory finished this joint ?


Ron B
In the bottom picture,has the bottom been butt welded along that seam ?. It is one peice that is welded to the base panel along that line of spots.
All the rest looks fairly typical,especially the rust.. The boot lid gap is normally leaded so it can shaped to align the gap. Fit the boot lid to check the gaps when repairing it,but remember the rubber holds the boot lid up . Thats where the quarter is welded on.
Mercedes had a tool for holding the panels in alignment but I don't have measurements for it.


quote:
12-14-2004, 11:49 PM #8
Tom Hanson
MBCA Member

What the heck, try to stuff a MB 6.9 liter V8 in it. What a machine that would be..
__________________
Tom Hanson
Orange County Section
Art Love
Paul,
See that garnish mould clip on the right in your first picture - drill the 2 rivets out, straighten it and save it and all like it. Get them rezinced if necessary. They are NLA and the 115 part that M-B supply as a replacement has a single rivet hole and will not match up with your existing holes. If some of yours are rusted out, go to the wreckers and get yourself a supply. I'll get a picture of that rear seat area for you and post it separately.
Art
Art Love
Paul,
Here is the only one I can find on a quick look. If you send me an e.mail to artlove@bigpond.net.au, I'll take a few shots of any part of the bodywork you want and send them in high resolution. The pictures on this message board have to be less than 80Kb to post.
Art


olliw109
Hello,
In case you may give me your email-adress I dare to say I could provide you with pics of almost every mm of this type of car. But minimizing all those lovely pics is a lousy thing of work for me....

300 SEL 6.3 3478+5327
Oliver
pjtigger
Things are progressing along now , finished stripping the body shell and have now mounted it on the alignment frame


I thought i'd have a quick look at what was under the filler between the rear quarter & screen - not a pretty sight !


The car has now been moved into the workshop & i have started removing the rear metalwork so the rust & badly repaired accident damage can be sorted


olliw109
Hello Paul,
yes, thats the way it usually goes....I have got another one of that quality in stock....waiting for whatever....
I can identify proper areas on your pics.
The area under the rear window is critical due to dirt, leafs, moisture and resulting rust etc. in there. I dont know what it is called in English, in German it is called -Beplankung hinten unten-. It connects both sides of the car in the middle.....and is made of two parts with lots of connecting points. I replaced it new ones which also cost some copper and tin thanks to the way MB built their cars at that times....
Bumpers, stuff like that etc. does not really matter and can easily exchanged.
Go for it!!! Would love to see more of the forthcoming!!


300 SEL 6.3 3478+5327
Oliver
Art Love
Paul,
I haven't forgotten those extra pictures, just have not got back to the car.
Art
pjtigger
Before i started work on this car i knew it had suffered rear accident damage that had been very badly repaired and so i would have to remove all of the rear end of the car to repair it correctly. Things have been progressing well - the rear end is now removed ! , The rear end came out a lot easier than expected as a lot of it had been brazed in (with brass) and any welding was of a very poor standard with minimal penertration so could be easily cut.

Before removing the rear section i'd welded braces across the rear door openings to support the rear roof.

Still trying to get organised in the workshop - to many toys & not enough space [:)]


Once the rear was removed it became apparent how bad the repair work was , A brand new rear had been fitted but to install it someone had cut the bottom out of the section that fits round the sills , a patch had then been tacked over the hole.


The rear section was still in its original e-coat - they hadn't even botherd to paint/underseal it but its in basically sound condition & so can be easilly rectified before reinstallation.


pjtigger
Time for an update.

The rear section of the car had been removed so that it could be re-alligned properly and any damage rectified by its poor inital fitting - the lip that goes round the transmission tunnel had been hacked about and the "ears" that go round the inner sill/rocker were damaged/missing/bent (If these repairs had been in another accident i think the car would have fallen in half) . The boot/trunk floor was in very good condition except for the back edge which had a lot of holes burnt through it from the poor welding and it was distorted where someone had tried to adjust it with a hammer !! so it was decided to replace it.

Floor removed (its much easier when its not in the car [:)])


And the new one spot welded in


The main floors are also being replaced . I was lucky and was able to save a section of the old floor that can be used as the extension band

Cutting the nice new panels from Mercedes to add the 100mm


Trial fitting the new floor before spot welding them in


When the L/H floor was removed the diagonal stiffner was found to be twisted/crushed but a bit of time & carefull use with a flypress & block fixed this


Ron B
The lengths the English go to ressurect a car never cease to amaze me .Here,that car would have been scrapped and parted out as being too far gone. ( I have done it myself....)
The floor that was used to replace the damaged one in the past is a W111 Floor and it has the open holes rather that pressed shapes that the W108 had. No other difference otherwise.


quote:
12-14-2004, 11:49 PM #8
Tom Hanson
MBCA Member

What the heck, try to stuff a MB 6.9 liter V8 in it. What a machine that would be..
__________________
Tom Hanson
Orange County Section
Chris Johnson
I hope I never have to get into a car that far. Growing up in the western part of this country, you see lots of old cars with faded paint and some wrinkled sheetmetal, but rust to that extent is nearly non-existant. If you see a badly rusted car, you assume somebody just managed to limp it in from Minnesota.

I'm reluctant to take on a car with rust just getting started in the front of the rockers. Like Ron, I've parted out cars that were nowhere near as bad as what you are starting with.

Chris Johnson
If you aren't constantly impressed with your car, then it needs fixing.
100.012-12-000790
100.012-12-000867
www.300SE.org
Kai McRae
What is the black stable mate?

Looks kind of like an Espada

1971 6.3 - #5417 -
(LPG)
1982 230E - W123 (M102)
Art Love
Ron,
The boot floor in a W109 is a 110 part number. The new part from M-B comes with those holes in it (See the other pictures of the new boot floor). The metal discs are held in with sealant. There is no part number for the disc in the Parts Manual, and you have to retrieve them from a W108/109 donor or reuse the ones in the car you are doing if they are still useable. We have just been through that with #5810 at Justins. Had to do the same thing with #1702 15 years ago. I sometimes wonder whether there is a draw full of those discs in the Spare Parts Department for want of a part number for people to order them[:D][:D].
Art
pjtigger
You guys in the warmer drier climates are lucky with your rust free cars - here in the UK an original rust free car is very rare - i was quite supprised how little rust the car actually had in it . Most of my other projects have been far worse !!

1942 Ford GPW


1969 Maserati Ghibli


The Maserati is an long running project for the same person who owns the Merc (the Jeeps my own) Its a hand made body so all the panels have had to be made - i've been on it about 3 years now but the Merc is his priority

Most of the rear end work now done


Its the Black car next to the Merc - it was sent away for stripping & E-coating . The nose needs finishing & then it can all be painted


Art , I might be able to help with the part number on those cover plates - when the car was re-built they were very lazy and left all the Mercedes parts labels on everything - i think the plates still have them on . I'll have a look this afternoon.
olliw109
Dear Paul,
your efforts encourage me to believe that even my euro-no. 3478 (with structural rust/decay in all important typical areas) is worth not being slaughtered but to be restored in an adequate manner one day.

That is a totally different entry compared to my (previously) neglected US-5327 without those dramatic rust areas.

Keep restoration going and let us share your results!!Respect!!

300 SEL 6.3 3478+5327
Oliver
Art Love
Paul,
I have a question for you. Based on your experience dealing with cars from different manufacturers, how many other car manufacturers do you know that can still supply a significant number of body panels for vehicles from 40 years ago? I have always been impressed by M-B's spare parts supply. I am not talking about aftermarket manufacturers, but factory support.
Art
pjtigger
Art
Mercedes are by far the best for support on there older models , the only other company that even comes close is Porsche. I've a E-type & the only bodywork Jaguar can supply is a bonnet.

The classic centre seem to be hard work to deal with , Strangley the best factory to deal with is Maserati - a company thats gone bankrupt numerous times & had many owners , they can't supply parts but there archivist is realy helpful. Contact him for info & he normally gets back to you the next day.

The part nos for the cover plates are 110 683 02 01 which has been replaced by 123 683 00 10 for the covers under the rear seat and 110 683 01 10 which has been replaced by 123 683 00 10 for the boot/trunk floor . If you have access the the Mercedes EPC they are on section 68 01 for the 109
Art Love
Thank you. Found them.
Art
pjtigger
Thinks have been progressing along a little slower than i'd like . Both the inner & outer sills/rockers need to be replaced but the L/H inner is now NLA from Mercedes so its taken a bit of hunting to find a NOS one , fortunatly Karasch has one so i'm now waiting for it be be delivered anong with a couple of other NLA bits that he could supply.

While i'm waiting for the last panels i've been able to get on with a couple of other things.

Mercedes supply the inner sill as the 108 / short item so it needs extending but the extension bands are NLA so they need making (the hole & pressing in it seem to serve no use but i put them back as per the original)


I also need to ensure the sill is straight & the correct length when re-joining it so a couple of large box sections are used as a jig.

The finished sill & then tried up against the new outer (which is supplied by Mercedes in the extended length)


When i put the panels back its always my preference to spot weld then in where possible but fitting the floors causes a few problems because of how far the spot welds are from the edge . I've been planning on making a deep spot welder frame for some time but never quite got round to it but for this job it would be very useful (you can use long arms on the welder but you can't get a good pressure on the tips)

After a few days i now have a deep spot welder which will come in very uses full on some of the other projects to.


(the block of wood it just to support it while i take the photo [:)])
Ron B
I have seen on a couple of SEL'S that the outers were also extended panels. Mercedes Must have tooled up for the longer part later in the run. I like the idea of the longer spot welder ( I nolonger have one ,should have kept it) especially to get the factory look again.
Do you work from Home? What do your neighbours think? [:)]

quote:
12-14-2004, 11:49 PM #8
Tom Hanson
MBCA Member

What the heck, try to stuff a MB 6.9 liter V8 in it. What a machine that would be..
__________________
Tom Hanson
Orange County Section
pjtigger
Ron

On the outer sills Mercedes have not tooled up for the longer panel - you can see the weld on the inside where they have taken two short sills & welded then together .

The new spot welder is working great - i have now started fitting the floors . They have gone in much easier than expected the the welds look like factory originals [:)]


The design of the sills on this car seems to be vunerable to miss-jacking - if someone is not familiar with the car and tried to put a trolley jack in the wrong place on the sill (both inner and outer) can be easily damaged . I've been discussing with the owner about designing a central stiffner to go between the two halfs to prevent damage if someone does something silly. Not original but it would be invisible and prevent a lot of trouble if someone did something wrong (tyre fitters etc)

P.S i don't work from home - most of the photos are taken at a workshop i borrow from a friend
Ron B
Two places you never lift any W110-109 Merc are the sills and the cross member behind the bumper. I have lot count of the bent ones I have seen.[:D] The Jack points are available new. I have seen a few US and German ebayers selling them too.

quote:
12-14-2004, 11:49 PM #8
Tom Hanson
MBCA Member

What the heck, try to stuff a MB 6.9 liter V8 in it. What a machine that would be..
__________________
Tom Hanson
Orange County Section
pjtigger
After much delay i can now carry on. The big holdup was the left hand inner sill . Its NLA from Mercedes but i eventually tracked a NOS one down at a German specialist . He shipped it to the UK but the courier failed to deliver it & held it in there depot for 2 weeks before sending it back to the supplier in Germany . The supplier resent it but when it arrived the supplier had sent the wrong part !! so it had to be returned . The correct part was then dispatched but the shippers attached the wrong post code to the parcel & were going to try & deliver it to a pub in south London , a few frantic phone calls got the parcel redirected & i now finally have the part (6 weeks from ordering to delivery !!).

The long awaited left hand inner sill


After lengthening (yes all that time & money & i had to cut it in half!) the sill was finally fitted


And the right hand one also in place now


The last panel that i have been looking for was the spare wheel well side (goes on the RH rear chassis rail) . Mercedes EPC showss this as a unique panel for the 6.3 & one could not be found anywhere . After studying the parts list i decided to take a chance & order the standard 108/109 non 6.3 panel as all the other panels it attaches to are common - the panel only needs to have a hole different for the manufacturers to give it a totally different part number. When the panel arrived from Mercedes the only difference was 2 additional smal screw holes . I don't know why none of the speciaist companies i contacted could have told me this & saved several weeks of phone calls [:(].

Howefully i'll be able to bring the two halfs of the car back together next week [:)]
pjtigger
I haven't posted an update for a long time as i've been rather busy - the owner of the 6.3 brought a 250SL but the engine was a bit sick (why it was so cheap!!) so i've been distracted with that for a while


The engine has just come back from the machine shop after line boring , sleeveing etc etc (glad its not my money) [:)]

The 6.3 now has its 2 halfs attached !


The owner was getting fedup with damaged sills/rockers on his Mercedes & so he aske me to add a stiffner between the inner & outer to try and prevent them distorting when someone not familliar with the car sticks a jack in the wrong place (i know its not original but it is invisible when the sills are on & should hopefully reduce the risk of damage) the front cross member also had a similar stiffener added.


Now that the back is finished i've moved onto the front. The front cross member had to be replaced and the top edge of the inner wings was badly corroded . New edges were fabricated and fitted . The stiffners on the inner wings were also replaced as the top edge was rotten . The left hand one on a RHD car is unavailable but a LHD one could be easilly modified (it has a step in it for the battery).


Things are moving on well now - i'm just fitting the outer sills/rockers & hopefully all the metalwork will be finished in a week or so


Ron B
great idea!,another is to threaten any one responsible for lifting the car with a sore backside.
A point to remember is to never lift a complete 6.3 and let the front axle hang. There is too much weight on the two crossmember mount bushes and they will tear.

quote:
12-14-2004, 11:49 PM #8
Tom Hanson
MBCA Member

What the heck, try to stuff a MB 6.9 liter V8 in it. What a machine that would be..
__________________
Tom Hanson
Orange County Section
Dan Smith
OK, all I can say is that I went through the photos and now have lapsed into a state of shock.
Is there a better way, (defined as economical and will end up a much more solid auto)?????
Why not buy a USA West Coast 6.3, yes the steering wheel is on the wrong side. Transfer whole systems to your Right Side Driver. The whole rear 1/3. Maybe the whole front except for your needed Right Side Driver equipment, AND the right sight frame part with your serial #. Maybe the entire cabin.
In the end you will have never rusted and solid parts.
As Ron, Chris and others have written, you guys in England deal with this stuff. Where we are here in the USA West Coast, no one deals with it, we part much better 6.3s out. What I don't understand is the Right Side driver difficulties. Maybe your trapped. Either way, your doing the Lords Work in the preservation job.
pjtigger
Well the metalwork is now just about finished !! I did a quick sum & it looks like its taken 750 hours to get to this stage !

The body shell in now booked in for stripping & e-coating (the body is submerged in a tank of paint just like a new shell) This should take about 4-6 weeks & then the rebuilding can start [:)]

I'll just post this picture for anyone who hasn't seen a 6.3 underneath (unless they've been runover by one [:)])


pjtigger
The body has now been shipped off for stripping & e-coating - should be about 4 weeks


And now onto the mechanicals [:)]


pjtigger
The bodyshell arrived back late this evening , I managed to take a few photo's but it was getting dark . Once its unloaded i'll be able to get better ones


Mike Freed
If anyone could ever say it, I believe you almost are at the perfection level on that car's foundation. Very well done and inspiring. Another great restoration is in progress.

Art and his family, you and others in the club, have preserved many MBs that will continue to keep the classic days of Mercedes alive and well. I'm glad to be a part of it by simply being a member and knowing of you all.

In the meantime, I keep my 6.3 driven and in front of faces at the local dealer from time to time, hoping they never will forget the history they ought to know.

Mike

pjtigger
Thanks for the words of encouragement Mike - hopefully the rest will turn out as well [:)]

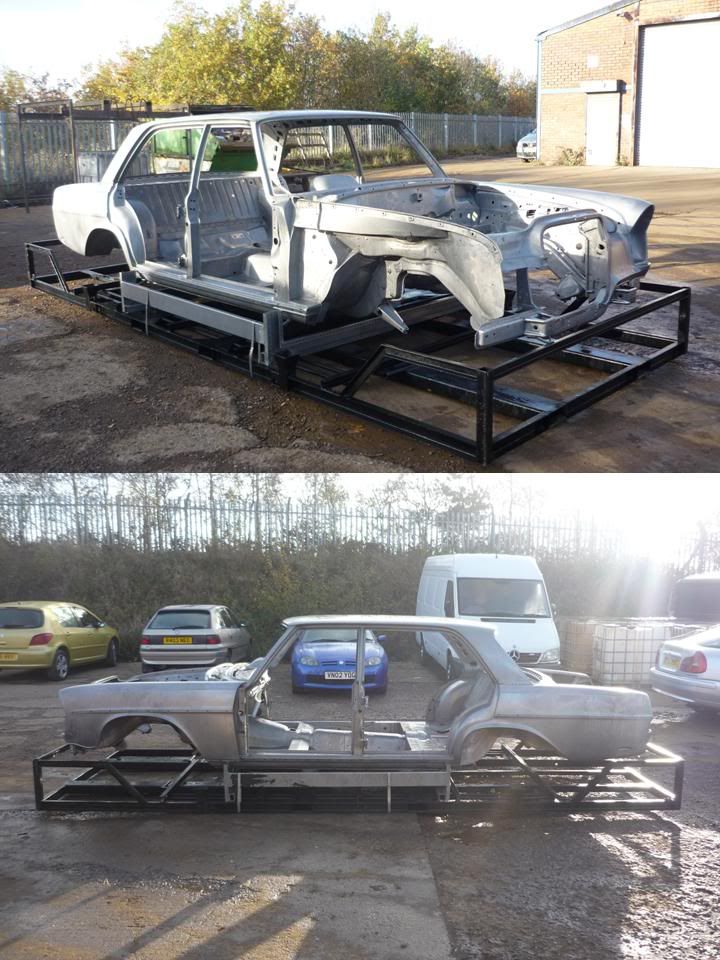
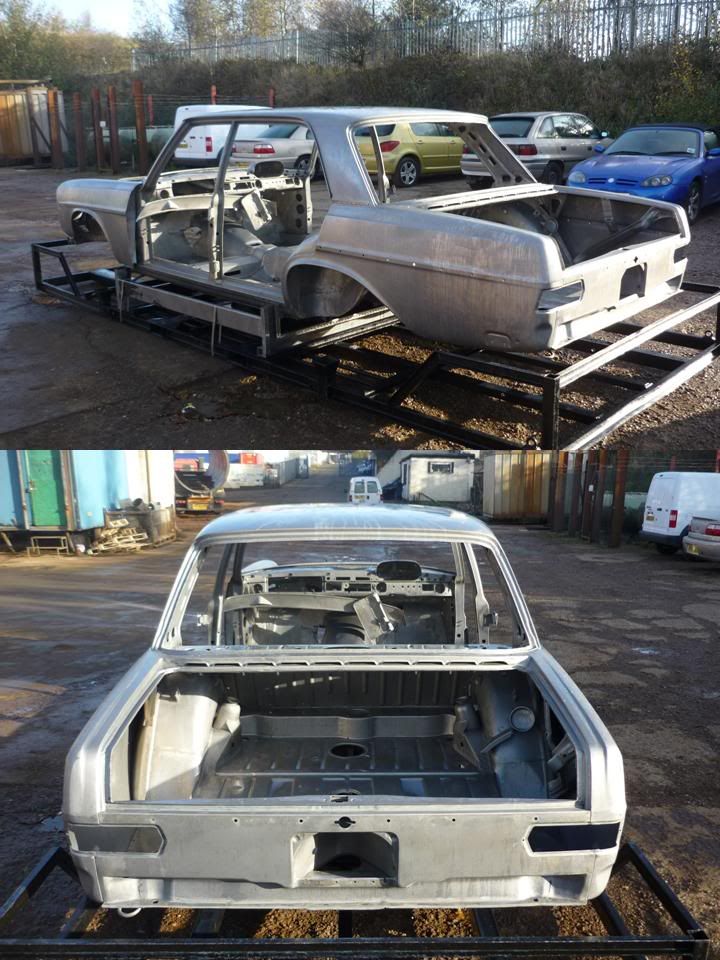
The weather has been so bad here that we've been unable to unload the shell and so i have not been able to take any good photos but the company who stripped & dipped the body sent me some pictures of the shell part way through the process - it had been stripped but not yet e-coated


While the shell was away i made a start on the axle , Ron had kindley sent me a copy of the relevent pages from the manual for the axle and advised on what manual to look out for. After a bit of seaching i found a set for sale in the US (a bit expensive but well worth it)


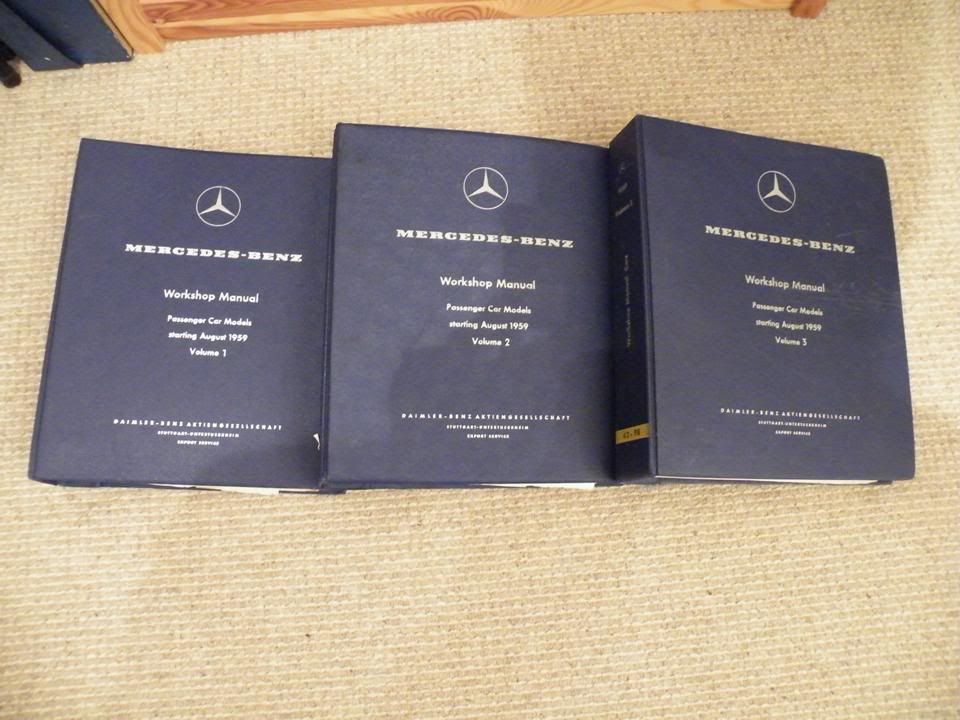
The pages look like have never been used & i plan to scan them and then i can print off a copy to use in the workshop.

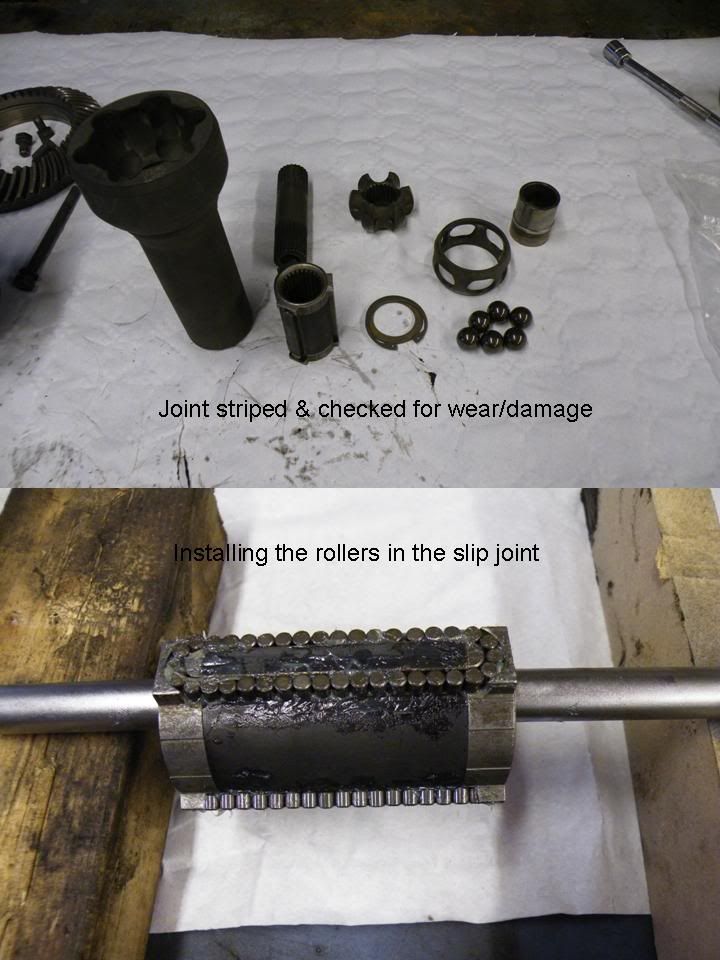
I stripped the axle completely & anything worn was replace. It was suprising how little wear there was - the crownwheel & pinion look like new !


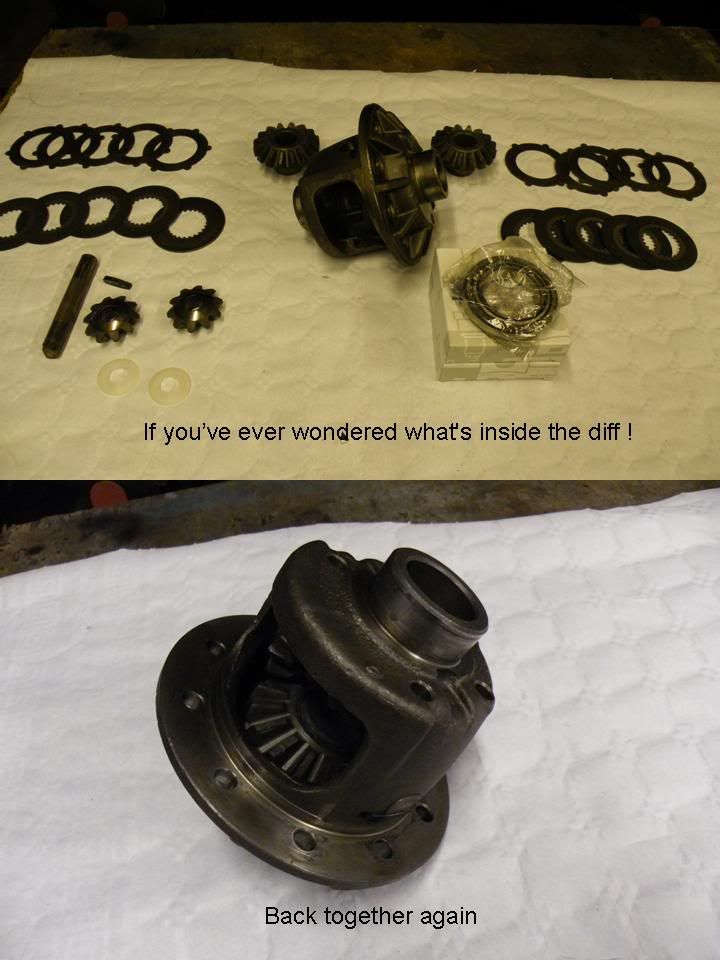
Putting the rollers back in the slip joint is not a nice job - it took ne nearly an hour.


I'd had a discusion with the owner about the finish wanted of the suspension components and both of us had said that we did not want the parts high gloss - more semi gloss/satin as per the originals. After a bit of hunting i came across a Glasurit paint - Mercedes Benz semi gloss chassis black - MB9124 . This was a commercial vehicle chassis paint - just right to withstand the English weather [:)]


The only problem i've run into so far are the 2 bronze bushes the axle pivots on - there NLA from Mercedes & seem to be a custom size so i'm having 2 made specially by a specialist.
Ron B
That car is going to be too nice to drive in English weather i think...[:)]
The manuals look like a good buy,congratulations! .
I've mentioned before on here that the manuals were only supplied to dealers so to actually find a set is unusual and as with any specialist publication they are going to cost$$. Keep them insured .

quote:
12-14-2004, 11:49 PM #8
Tom Hanson
MBCA Member

What the heck, try to stuff a MB 6.9 liter V8 in it. What a machine that would be..
__________________
Tom Hanson
Orange County Section
Art Love
Paul,
All very nice[8D]. That semigloss is correct. If your man is making two of those bronz bushes, can you ask him for a price for 6 or even 10? Justin is at exactly the same stage with the diff in #5810. It is usually cheaper per unit to do several units than one or two, and I'm sure that Justin would take 2 or 4 and maybe others on this board would be interested.
Art
pjtigger
I'll ask the company on Monday , for 2 bushes they are charging £35 each !. I could make the bushes but i can't machine the figure of 8 oiling spiral on the inside so i've had to find a specialist. I visited a number of small engineering companies locally & they could all make the bush but not cut the oiling spiral - the cost of programing a CNC machine for a couple would be prohibitive. The specialist i found only make bushes so they have a special machine for the job. I'm having the bushes made with the inside bore 1/2mm undersize so they can be reamed to mach the sleeves when installed.
james lawson
If you are interested I would also be interested in two.
[:)]

jim
Ron B
I'll take two also.[:)]

quote:
12-14-2004, 11:49 PM #8
Tom Hanson
MBCA Member

What the heck, try to stuff a MB 6.9 liter V8 in it. What a machine that would be..
__________________
Tom Hanson
Orange County Section
olliw109
Hello;
I would also take two. Overhaul of the rear axle/diff is the next job in my project 5327. Please send my a private mail with your details.
Thank you in advance.[:o)]
Oliver

300 SEL 6.3 3478+5327
Oliver
pjtigger
The weather has finally got better here so i've been able to unload the shell & take some better photo's.


I'm very pleased with the result so far - i think its about as close as i can get to a new bodyshell [:)]

For those of you who expressed an interest in the axle bushes i'm waiting for a new quote to come back from the company for the revised quantity & i'll contact you as soon as i have the info.

Paul
Ron B
...and the Citroen?[8D]

quote:
12-14-2004, 11:49 PM #8
Tom Hanson
MBCA Member

What the heck, try to stuff a MB 6.9 liter V8 in it. What a machine that would be..
__________________
Tom Hanson
Orange County Section
pjtigger
The Citroen belongs to the owner of the 6.3 !!. It had been in a barn for a number of years & has only done 20000 kilometers. Its great for short journeys but at its top speed about 55mph its deafening inside - you have to wear ear defenders. It has a low floor that makes loading much easier than a modern van and you can lay an 8 x 4 sheet flat on the floor (you cant do that in many modern vans of the same size). It can carry about 1 tonne but being French has a few unusual design features. Only 3 forward gears with a reversed shift pattern , a hand brake that works on the front wheels and no oil filter on the engine (thats a 1930's design). It does attract a lot of attention & a lot of people wave to you as you drive around.
Ron B
I saw one in an Audrey Hepburn movie the other day..[8D]

quote:
12-14-2004, 11:49 PM #8
Tom Hanson
MBCA Member

What the heck, try to stuff a MB 6.9 liter V8 in it. What a machine that would be..
__________________
Tom Hanson
Orange County Section
S class
That's magnificent. Thanks for sharing the pictures.

I'm interested in having some of this stripping and e-coating done in South Africa, but I'm having trouble finding anyone who does it. Is there perhaps an alternative name for the process?

Thanks


116.036
116.036
116.024
107.044
202.018


Craig Tucker
Paul,

Great job........

DO THE TRIAL FITTING OF THE FRONT AND REAR SCREENS NOW!

C.T.

1969 300SEL 6.3 (to be AMG 6.8 replica)
1971 300SEL 6.3
1993 300E-24
1959 220SE Ponton
1983 Schuler 5.0lt Range Rover
Ron B
quote:
Originally posted by S class

That's magnificent. Thanks for sharing the pictures.

I'm interested in having some of this stripping and e-coating done in South Africa, but I'm having trouble finding anyone who does it. Is there perhaps an alternative name for the process?

Thanks


116.036
116.036
116.024
107.044
202.018


It's not a common process outside of manufacturing plants. I know of the english company and one or two in the USA who do it. There isn't even a stripping place here in OZ that does dipping anymore so we are on our own here.

quote:
12-14-2004, 11:49 PM #8
Tom Hanson
MBCA Member

What the heck, try to stuff a MB 6.9 liter V8 in it. What a machine that would be..
__________________
Tom Hanson
Orange County Section
pjtigger
Time to post a few updated pictures , The weather hasn't been good over here so i've spent most of the Christmas break putting central heating in the workshop ! -6 outside & snowing !

After the body came back from e-coating it was given a coat of Glasurit epoxy primer and then i spent 3 days seam sealing all the seams (there's a lot of them on a 6.3)


This was then given another coat of epoxy and then the stonechip/guard applied (used 10 litres so far)


Once this has fully dried it will be given another coat of epoxy and then the colour can be applied (picked up the colour from Glasurit just before Christmas)
Kai McRae
Awesome to see.

Did you take the opportunity to reinforce steering box area?

1971 6.3 - #5417 -
(LPG)
1982 230E - W123 (M102)
pjtigger
A few more new pics - just started to spray the base coat (180 Silver Grey) colour on the underside , engine bay & inside the car.


Next pics should be with the clear coat on [:D]

mirafioriman
Looking good[:D]

I love this stage of the job[:)]

Mercedes W116 450 SEL 6.9, W109 300 SEL 6.3, W126 420 SEL, Fiat 131 Mirafiori (X4), Fiat 130 saloon, Fiat 132 1800ES, Fiat 132 2000, Fiat Argenta and a Mk1 Ford Escort!
mirafioriman
Just read the whole thread. I think I know who you are now [;)]

Fantastic work. There is another site I visit ( www.retrorides.proboards.com ) where someone has done similar standard work to you but made a lot of repair sections himself (it was on a Vauxhall Victor.)

Threads like this are great because they inspire you to try and improve the standard of your own work.[:I]

Mercedes W116 450 SEL 6.9, W109 300 SEL 6.3, W126 420 SEL, Fiat 131 Mirafiori (X4), Fiat 130 saloon, Fiat 132 1800ES, Fiat 132 2000, Fiat Argenta and a Mk1 Ford Escort!
Return to Forum