| Last Post |

arcijack
|
|
3/15/2016 9:33 AM

|
|
thanks Brian
|
|
|
|
wbrian63
|
|
3/15/2016 8:37 AM
|
|
This thread is ages old - not sure you'll get a reply from pj, so I'll try to answer.
In a w116 chassis, the extra band that extends the floor pan from SE to SEL is lapped in and spot-welded. I expect the same is true in a W108/W109 car.
On my restoration, where I'm replacing metal, I go back with the same method as the factory used.
A butt welded panel patch will always be better at resisting rust in the future because there's no gap for moisture to penetrate.
That being said, butt welding the thin material used for much of the chassis on a W116 can be a complete PITA. The non-structural material on my W116 is .035 thick. If there is ANY rust lurking at the weld point, the underlying metal will just evaporate when you hit it with the arc. Additionally, in many areas where the panels were stamped during production, the metal is very thin because it gets stretched as it's pulled over the stamping dies. That can cause problems with blow-through as well. Butt welding is a slow and tedious process, but if done properly is all but invisible, even before any paint or filler is used.
It will be easier to lap a patch over existing material and use plug welds to secure. Just be sure to paint the lapped sections before welding. I'm using a 2-part epoxy primer that I mix in very small batches (I use a large syringe to make sure I've got the proper 2:1 ratio of paint to catalyst). Paint both pieces, then I drill a series of 1/4" holes in the piece to be lapped over the existing part. Once the patch is in place, I use a 4-flute carbide end-mill in a drill to remove the paint through the drilled holes to create a good place to weld.
The epoxy burns back a bit around the welds, but not as much as you'd expect. If you want to help resist rust after the weld, you can mix some more epoxy primer and slather it around the welded areas and let it migrate into the gaps between the panels - capillary action at work.
Once patched, a quality seam sealer on top and bottom should provide as good a rust-resistant seam as can be had.
W. Brian Fogarty
'07 Lexus LS460L
'76 450SEL 6.9 Euro #521
'02 S55 AMG (W220) - sold
'92 300SE (W140) - sold
'76 450SEL 6.9 Euro #1164 - parted & gone
"Bond reflected that good Americans were fine people, and most of them seemed to come from Texas..." Casino Royale, Chapter VII
|
|
|
|
arcijack
|
|
3/14/2016 11:19 PM
|
|
in picture 13 where Mr Tigger add a band to the new floor pans did he butt weld or lap weld the band to the new floor, the reason i am asking, the old car i purchase has pretty good floor pans and i want to cut the rust out and weld up, but the pans are paper thin seems as but welding these things would be a chore.
|
|
|
|
RichardH
|
|
10/26/2013 3:29 AM
|
Hi, I'm the owner of this 6.3. The holes in the gusset plate are to strengthen the sill section vertically should someone try to jack the car up in places other than the jacking points. The holes are flared to create a strong rigid panel. You can see the thickness of the flare on the inside face of the gusset plate. The two small holes at the bottom do not have flares as they act as drain holes. This project is still ongoing but has concentrated on the engine and gearbox commissioning on a test rig as described in Art's comment about the up and coming article in Lode Star. On another note, the sound deadening sheets were purchased from a UK trade supplier. Most sound deadening sheets available here in the UK on a retail basis are sold in small sizes (500 x 500mm). This material comes in 1500 x 1000mm which is ideal for the car. If anybody needs contact details please let me know. They also do the fibreglass heat reflective sheeting in the same size at a fraction of the MB price. quote:
Originally posted by benz_head
Mr. Tigger,
Why did you perforate the metal that you used to reinforce the sills?
This is a brilliant idea, especially for a 6.3. The engine's torque can twist the frame rails and chassis!
Thanks,
benz_head
#1349
|
|
|
|
Art Love
|
|
10/18/2013 6:22 PM
|
|
Peter,
Paul is unlikely to answer. This is an old thread that I have made "sticky" to keep it near the top of the Forum and he will have moved on to other projects. The obvious answer is to save weight.
Art
|
|
|
|
benz_head
|
|
10/18/2013 1:27 PM
|
|
Mr. Tigger,
Why did you perforate the metal that you used to reinforce the sills?
This is a brilliant idea, especially for a 6.3. The engine's torque can twist the frame rails and chassis!
Thanks,
benz_head
#1349
|
|
|
|
Art Love
|
|
7/9/2013 8:15 AM
|
|
The article on the first firing up of the rebuilt motor should be in our next Lode Star. I have permission for it to be reproduced from the UK M-B Club Gazette and Eric has the contact with the editor there to get it when he is ready.
Art
|
|
|
|
oversize
|
|
7/9/2013 7:14 AM
|
The restoration on this car is just amazing! I'm not worthy! LOL! [;)] Mark  Last of the steel Mercedes 2001 Ford AU Fairmont Ghia 5L (Deep Blue)1980 450SEL #101122 (Green Lantern)1979 6.9 #6301 (Blue Flame)1979 6.9 #5541 (Red Bull)1979 6.9 #5318 (Silver Arrow) 1979 6.9 #5298 (Man o War)1978 6.9 #4248 (Skye Blue)1979 6.9 #3686 (Moby Dick) 1975 450SEL #28414 (Gold Nugget) 1957 Buick Roadmaster 73A (Titanic)
|
|
|
|
Ron B
|
|
7/3/2013 5:49 PM
|
The things you need are bostic self adhesive sound deadning pads. you need enough to to do the whole floor from the front foot qwells (about 6" up the sloping part ) ,right through to the rear foot wells and under the rear seat. Bostik 8104 SDS Boscoseal 16 Description; High performance, bitumen ‘Blue backed’, bitumen- Self-adhesive rubberised sound deadening pads,  quote:
12-14-2004, 11:49 PM #8
Tom Hanson
MBCA Member
What the heck, try to stuff a MB 6.9 liter V8 in it. What a machine that would be..
__________________
Tom Hanson
Orange County Section
|
|
|
|
Art Love
|
|
7/3/2013 5:39 PM
|
|
The rubberized sheeting that goes on the floors can be bought locally from upholstery suppliers or you can buy the original material from Tom Hanson at the Classic Center in Irvine California. It comes in sheets and usually has preapplied adhesive on one surface. You can also buy the original bitumen/fiber sound deadener sheeting that goes in the doors, on the firewall interior and behind the rear seat and other places in sheets of different thickness from Tom as well as new boot side panels where the fuel tank breather attaches. The boot side panel is pre-cut as are the door anti-squeak pads, the rest is bought by the metre and is not very expensive. About the only things you can't get are the pre-cut bitumen/fiber pads that go on the firewall in the engine bay.
Art
|
|
|
|
4882
|
|
7/3/2013 6:48 AM
|
|
Hi there just wondering if anyone knows where to find the sound pads that on page five.
Thanks for any info on these or any other suggestions for boot and interior
|
|
|
|
Ron B
|
|
6/11/2011 7:51 PM
|
The owners parts books have very pics of all the extra bits for the aircon if you need a reference. Even the firewall pads are different . There is also a sound pad under the air scoop on the passenger side above the blanked off eye ball vent hole . The aircon option must have been a seriously expensive item back then considering the low numbers on right hand drive cars and the difference between right and left hand drive. quote:
12-14-2004, 11:49 PM #8
Tom Hanson
MBCA Member
What the heck, try to stuff a MB 6.9 liter V8 in it. What a machine that would be..
__________________
Tom Hanson
Orange County Section
|
|
|
|
pjtigger
|
|
6/9/2011 6:53 PM
|
We brought this as a parts car because is had A/C in it 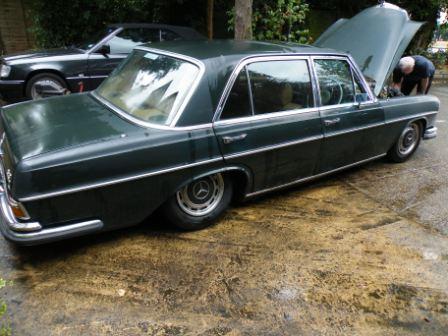 After we removed all the A/C from it we decided it was to good to scrap so another friend had it , he was not bothered about A/C but we have most of the bits needed from a fire damaged car so it could be put back later
|
|
|
|
Ron B
|
|
6/9/2011 6:08 PM
|
Did you get all the ducting ? there are special block off plates for the eye ball vent boxes etc . the eye balls are no longer connected to the air scoop in front of the windshield. I have complete set up for W108 and W109s here and it takes two large boxes to contain all the parts. quote:
12-14-2004, 11:49 PM #8
Tom Hanson
MBCA Member
What the heck, try to stuff a MB 6.9 liter V8 in it. What a machine that would be..
__________________
Tom Hanson
Orange County Section
|
|
|
|
pjtigger
|
|
6/9/2011 5:43 PM
|
Thanks for that Art - my arms are still recovering from sticking them through the small openings !! Had a bit of luck & found a NOS Hirshman aerial in Germany  The other 6.3 we have here as the original Mercedes mounting bracket so i was able to copy it 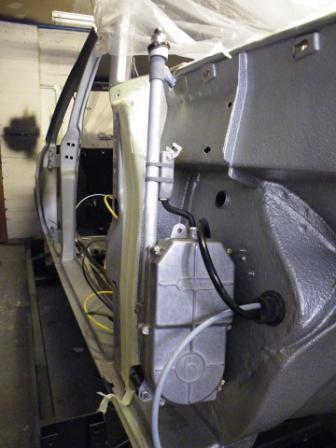
|
|
|
|
Art Love
|
|
6/8/2011 6:12 PM
|
|
Ha, ha, ha[:D][:D][:D]. Welcome to the club[;)].
Art
|
|
|
|
pjtigger
|
|
6/8/2011 12:17 PM
|
Nearly got the dash installed now - getting the A/C ducting etc in is a real horrible job ! 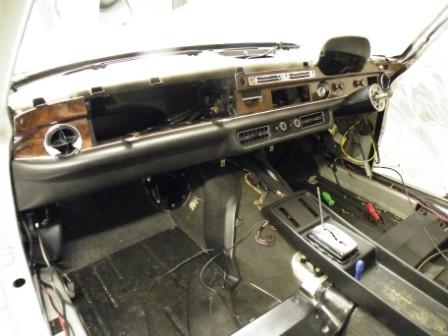
|
|
|
|
Ron B
|
|
5/18/2011 6:47 PM
|
quote:
Originally posted by olliw109
Hi Paul,amazing!!![:p] Respect!!
What kind of seal do you use for the oil pan of the transmission??
I start getting mad by this cork thing.....
Torque should be only 10 NM but it constantly refuses to be leak-proof[xx(][xx(][xx(]
Engine in (from above) takes us about 60 min., out 90 minutes (incl. exhaust), we started with a day....that is the kind of progress nobody wants!!
In/out/in/out ouch!!!
300 SEL 6.3 3478+5327
Oliver
I have had great success with loctite 542 flange sealer . It only sets hard under pressure and remains sticky otherwise. It doesn't leave hard(ish) lumps like selastic silicone does , which can and will end up in places where you dont want it. quote:
12-14-2004, 11:49 PM #8
Tom Hanson
MBCA Member
What the heck, try to stuff a MB 6.9 liter V8 in it. What a machine that would be..
__________________
Tom Hanson
Orange County Section
|
|
|
|
pjtigger
|
|
5/18/2011 10:39 AM
|
Just started looking at the door hardware. Pulled the window lift motors apart , all they needed was a good clean - removing the old grease that had just about set & then reassembling & adjusting the armature endfloat. The teath on one of the lift arms are worn but hopefully we've a spare that can be used. 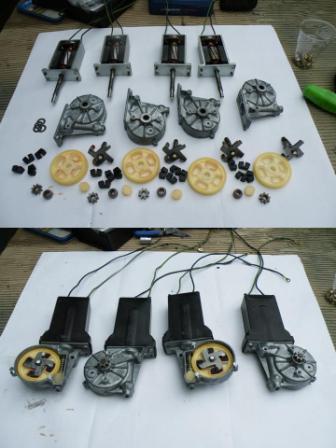
|
|
|
|
pjtigger
|
|
4/19/2011 12:51 PM
|
|
I'm using the Mercedes cork gasket. The problem with pressed steel oil pans is that the bolts get over tightened and the flange becomes deformed around the holes. I made sure the flanges were flat (every bolt hole on this pan was deformed) & so hopefully it will not leak.
|
|
|
|