| Last Post |

cth350
|
|
9/25/2019 7:35 AM

|
|
you can enable it and disable it at will. Turn it on when you're here or at other forums. -cth
|
|
|
|
thomasj
|
|
9/24/2019 11:04 AM
|
|
thanks, this add-in makes the browser noticeably slower, even on webpages that are stored locally.
Cannot recomment unless you really need it, so maybe only for short time installation?
regards,
Thomas
|
|
|
|
cth350
|
|
Filip CZ
|
|
9/18/2019 7:49 AM
|
Old pictures are gone. So please see mine.
To get it off is easy! Just follow the picture from service manual and use socket extension as suggested bellow.
I guess I have to remove at least three of damper bolts to get place to attach puller. I'm unable to release the screws (they seems to be hammered to prevent release)! Any idea?
Also thread on the crankshaft is damaged and the nut was filled with some thread repaid glue! Shall I do the same?


300SEL 6.3 #1285 (1969 EURO version)
300SEL 6.3 #5346 (1971 US version with engine KO)
|
|
|
|
Ron B
|
|
11/6/2012 6:36 AM
|
If you look at the damper ,there is a slot. It is for placing a 1/2" socket extension bar through it. Brace the end of the bar against one of the stud on the end of the engine . You can now use a regular socket and breaker bar to loosen the nut or your impact wrench. DO NOT use the impact wrench to try do it up again. Use a breaker bar to gently tighten the nut ,then torque it up properly.  quote:
12-14-2004, 11:49 PM #8
Tom Hanson
MBCA Member
What the heck, try to stuff a MB 6.9 liter V8 in it. What a machine that would be..
__________________
Tom Hanson
Orange County Section
|
|
|
|
6.3Nut
|
|
11/5/2012 10:51 PM
|
|
Guys I am planning to change the seal, wanted to know if I could use a 300 ft-lb impact wrench to undo the crankshaft nut.
There cars and then there are BABIES!
1969 Euro Model
10901812000931
|
|
|
|
Ron B
|
|
7/25/2009 6:31 PM
|
Sheldon,look around the air compressor for leaks too,the oil feed line is famous for breaking because you can see it and the rubber ,after 30 years,gets hard. The compressor base to it's bracket also has a seal under it. It's supposed to be a square section "o" ring . Use a round section and it will slide out when the compressor is moved when the belts are tightened. Another source of oil leaks is the compressor to steering pump seal. It's a double lip seal and when it goes,the power steering fills with engine oil then drip out of the reservoir. quote:
12-14-2004, 11:49 PM #8
Tom Hanson
MBCA Member
What the heck, try to stuff a MB 6.9 liter V8 in it. What a machine that would be..
__________________
Tom Hanson
Orange County Section
|
|
|
|
mthomas
|
|
7/24/2009 9:27 PM
|
|
I had replaced my front seal, oil chain and tensioner last week as well. I had the luxury of having the engine out of th car and this entire job was a breeze. I removed the oil pan as well and could hold the tensioner with my finger from the lower side for the installation. I fabricated a flex plate lock and had no issues with the whole job with the crank nut. I felt the flex plate was the surest way to spread the stress of the tightening job on the crank throughout the entire crankshaft, instead of all of the torque on the #1 piston and rod.
Mike
|
|
|
|
Art Love
|
|
7/24/2009 7:09 PM
|
|
An oil leak at the rear of the right hand head is the commonest spot on these engines. There is an oil gallery near the rear edge of this head. I'd do what Mike suggested. It is not a serious problem that warrants the cost etc of head removal.
Art
|
|
|
|
Mike Freed
|
|
7/24/2009 3:39 PM
|
|
Congratulations on the replacement of that seal and your technique!
Let's make sure you are talking about the cylinder head, rather than the valve cover. Is this the case?
About the cylinder head-- IF YOU ARE CERTAIN IT IS NOT THE VALVE COVER GASKET OR THE FUEL INJECTION PUMP LEAKING OIL AND DRAINING OUT OF THE HOLE AT THE REAR OF THE BLOCK: I think I would try to re-torque the head bolts in the sequence the WSM states. I did mine after I bought my 6.3 and found more than half of the head bolts too loose. This stopped my leak that was on the left side head.
|
|
|
|
Sheldon
|
|
7/24/2009 2:13 PM
|
|
It's good to know that I'm not alone in having my share of trials with this oil seal job. I baked the aluminum oil seal housing in the kitchen oven at 350 degrees F for about 15 minutes while my wife was away. The seal then went in easily requiring some very light pressure from a wooden block to firmly seat it. The WSM says to use a Hot Plate. Seems that Microwave Ovens and Electric Coffee Makers have replaced those things decades ago.
Drove the car to work yesterday and today and no visible oil leaks from the seal or the seal housing which I cleaned quite well before I started the job. To hold the oil pump chain tensioner in place I used some waxed string that the telephone/cable installers use to pull wires through the walls. I practiced a few times before applying sealant to the housing and installing it for keeps.
I have a slight leak from the rearmost cylinder head gasket on the right side of the engine. Can anyone direct me to the thread on removal/replacement of the heads?
Sheldon M. Rubin
The future ain't what it used to be. (Yogi Berra)
1961 300d Adenauer
1963 220SEb Cabriolet [280SE Conversion]
1969 300SEL 6.3 Euro #1439
|
|
|
|
Ron B
|
|
7/23/2009 6:36 PM
|
I find Mig welding wire is the best thing to holder the oil pump chain tensioner is place . At least the new seals don't require the cover to be heated. [:)] quote:
12-14-2004, 11:49 PM #8
Tom Hanson
MBCA Member
What the heck, try to stuff a MB 6.9 liter V8 in it. What a machine that would be..
__________________
Tom Hanson
Orange County Section
|
|
|
|
Chris Johnson
|
|
7/23/2009 4:50 PM
|
|
Doing this job the first time, I used the extension-in-the-notch-against-the-water-pump-housing method described in the manual to hold the crank from turning while loosening the big nut. It did work, but left a crack in the water pump housing. A new water pump housing was $300.
What I have been doing since is shoving a length of fine rope down the number one spark plug hole. Turn the crank so that the piston is down a couple of inches from ignition TDC, insert the rope, and turn the crank backwards until it won't move anymore because the rope won't compress. Now the crank's nut is easily removed without damaging the water pump housing. The same method is used with #1 coming up on ignition TDC to hold the crank when tightening the big nut.
I have had no problems using a piece of coat hangar wire bent into a small hook to retract the tensioner pad when reinstalling the cover.
I would agree that the difficulty in getting the balancer assembly properly installed on the crank is significant enough that, at a minimum, you have to have a lot of patience. I had the machine shop make some special tools for me to help expidite this process.
Chris Johnson
If you aren't constantly impressed with your car, then it needs fixing.
100.012-12-000790
100.012-12-000867
www.300SE.org
|
|
|
|
Sheldon
|
|
7/23/2009 2:56 PM
|
|
finishing this posting on replacing the Crankshaft Oil Seal: Getting the harmonic balancer/pulley combination proved to be more difficult than removing it. The balancer/pulley shaft must be exactly positioned for the two round pins to align with the half-round slots in the nose of the crank. Initially, I marked it with paint but found that it was not precise enough. So after pressing it on about half-way, I had to remove it and this time I used a small triangular file to make three alignment marks. Those marks should be directly opposite the cut-out for the Woodruff key at the end of the collar. I positioned the balancer/pulley with these markings inline with the matching slot on the crank.
Because the pulley is deeply recessed, it requires a special tool to start the balancer/pulley onto the crankshaft. I used an 8 mm x 1.25 mm hardened hex bolt and spacers made up of thick steel washers. The bolt is threaded into the tapped end of the crankshaft and tightened against the washers. As the balancer/pulley went-on, I found that it was convenient to replace the stack of washers with a section of thick-walled aluminum tubing. Another problem I ran into was preventing the crankshaft from rotating as I tightened. The Manual shows what appears to be a 1/2-inch socket extension placed over one of the recessed cut into the balancer at the Northeast position. This barely worked for removing the balancer/pulley; but kept slipping out during installation. Better results were had by using a 1/2-inch diameter bolt commonly used by utilities for securing equipment to the wooden power/telephone poles. Rotate the balancer so that the recess is at the Northwest position.
I found that I had to apply a lot of torque. A round breaker bar with 3/4-inch drive required a 3-foot pipe extension was used. When the assembly was about 2/3rds of the way on, I was then able to use the big nut and the five dished washers to complete the installation. The rotation will be dead tight when the balancer/pulley is on as far as it will go.
It was next to impossible to apply the specified torque which was over 250 ft-lbs. The bolt won't hold back the crankshaft. One has to remove the access cover on the auto transmission and block the rotation of the ring-gear or the flywheel. I decided not to do this, so instead I applied as much torque as I could using the bolt through the balancer method. Now if you place a long piece of pipe over a high-torque wrench with click-stop adjuster at the base of the handle, you risk damaging the torque set adjuster. Instead I applied about as much torque as I could using the breaker bar plus pipe extension. I think it was at least over 175 ft-lbs.
Another problem was installing the cover plate that carries the new oil seal. The WSM recommends using a hooked tool to pull back on the sliding rail so that is bears up against the chain between the crank and the oil pump. The hooked tool does not allow the cover to be pressed close enough to the block. The alternative method was to file a shallow groove into the plastic chain guide to hold a thin string in place. This allows the cover to be pressed up against the block with one hand, while the string is pulled on with the other. The string is released and then extracted thus allowing the sliding rail to assume its proper position.
In short, this job recommended for only the most motivated and experienced Mercedes Do-it-Yourselvers.
Sheldon M. Rubin
The future ain't what it used to be. (Yogi Berra)
1961 300d Adenauer
1963 220SEb Cabriolet [280SE Conversion]
1969 300SEL 6.3 Euro #1439
|
|
|
|
Chris Johnson
|
|
7/15/2009 12:08 PM
|
Hi Sheldon, The WSM does suggest a three-jaw puller, but I couldn't come up with anything that would work. Instead, I tried an internal puller, and it was much simpler and less threatening to the condition of the parts. Considering the difficulty in getting the damper assembly perfectly aligned on the crank so that the pins can be tapped back in, you may have to remove the assembly a number of times and reinstall it before alignment occurs. You might consider this approach. 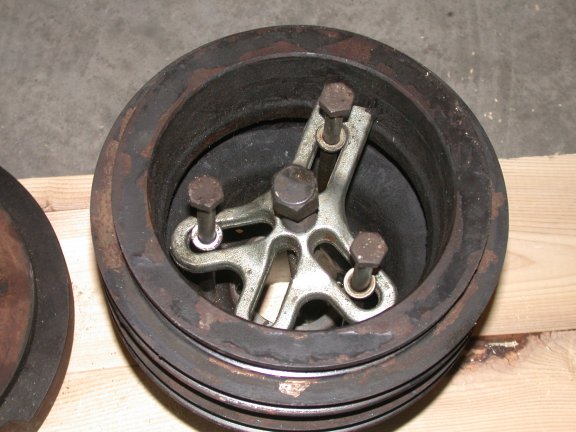 Chris Johnson If you aren't constantly impressed with your car, then it needs fixing. 100.012-12-000790 100.012-12-000867 www.300SE.org
|
|
|
|
Sheldon
|
|
7/15/2009 11:40 AM
|
|
Removing and replacing the front oil seal is not as straightforward as the WSM describes. Here are a few of the problems that I have run into thus far.
Removing the crankcraft nut requires a 3/4-inch drive socket. I used a 2-inch socket and a breaker bar. I had to extend the length of the bar by sliding a section of steel pipe over the bar. Don't use a swivel bar. I found that the round sliding type bar available at Sears provided just enough setback to clear the outer surface of the pulley. It also made a nice fit into the pipe.
Use a three-jaw puller with at least a 9-inch spread and a 6-inch reach. Two-jaw pullers won't work because they tend to veer off-center as the power screw is tightened. I tried out several pullers and found that a Chinese three-jaw puller marked 8-inch worked. OTC also makes a similar puller at higher cost. I so what looked like a similar puller at Sears. In any case, the Made in China puller did not break. One problem is that removing the radiator does not permit enough clearance for the power screw. Cutting down the screw is not an option because the grippers are also too close to the condenser. So rather than remove the A/C condenser, I removed the mountings and was able to angle it forward to create enough clearance without disconnecting any hoses. To do this, you have to remove the latch assembly on the cross member support. The horn support and electric fan, if so equipped must also be removed. Cut a piece of box carboard and tape it to the inside of the condenser to avoid damaging the fins. Place the jaws around the back of the harmonic balancer; but check that the links do not press against the edges of the pulley as you tighten. It may be necessary to reposition the jaws if the power screw does not remain perpendicular to the balancer and pulley. If your puller does not have quite the depth, then it is okay to place the jaws on the back of the raised portion of the balancer.
I next found that the A/C mounting bracket interfers with removing the leftmost screw holding the front cover that contains the seal. This requires removing the two front bolts, two side bolts and the one big bolt to the side of the engine block that secure the bracket. The mounting bracket and compressor may now be moved out of the way to the side. Remove the clamp securing the transmission oil line to the side of the block before attempting to move the compressor to avoid bending the line.
I will update my progress in a future posting.
Sheldon M. Rubin
The future ain't what it used to be. (Yogi Berra)
1961 300d Adenauer
1963 220SEb Cabriolet [280SE Conversion]
1969 300SEL 6.3 Euro #1439
|
|
|
|