help_outline Skip to main content

6.3

Suspension air compressor
aplekker
Rebuilding the air compressor for the air suspension on the 600 and 6.3 is not that difficult. This thread will describe the various steps. I don't know if these is a difference between the compressors for the different cars. In my EPC the compressor for the 600 has a different part number. On my 600 the pulley for the compressor has only one belt instead of two.
There is a repair kit available from MB for these compressors. The price is unbelievable, over $100. Although, is anything unbelievable when it comes to these cars? Part # 000 586 01 13.

Here is the combination of compressor and power steering pump as found on the 6.3. This set look pretty good from the outside.


After separeting the compressor from the power steering pump we will first remove the pulley. Since the nut is rusted to the shaft, I use my trusted air wrench to get it off. The best way I found to get these pulleys off is as follows: put a regular puller on the pulley, as shown. DO NOT PULL THE PULLEY OFF THIS WAY, it is made out of cast iron and will break. I put some pressure on it with the puller, not even a lot. Then lift the compressor by the pulley, about 2 inches from the work table. With a brass hammer, knock on the end of the pulley. In a few knocks the compressor will fall on the table.


Here the pulley removed. There is a lot of crud on the bearing cap, the seal ring must have been leaking.


Next we remove the four M6 bolts from the cylinder head. Between the cylinder head and the cylinder these is a valve plate. Here you see the top of the cylinder with head and plate removed. It a messy scene.


Here the valve plate, looking at the suction end. The reed suction valve can be seen.


In order to remove the cylinder we first remove the 4 M6 nuts on the cylinder base. Then we pull the cylinder off.


Here is the cylinder, looking from the bottom.


And here the piston, with four rings. With the ring tool, take out the snap ring on top of the wrist pin. The wrist pin can be pushed out by hand.


Here a view of the connecting rod and the crank shaft.


In order to get these out, we first take out the three M6 bolts that hold the bearing cap on the compressor base. By using a piece of brass, knock the crank shaft out towards the front from the other side. Here is the other side, connecting to the power steering pump.


With light blows on the other side of the crank shaft the bearing cap will move out. Here you can see the gap starting.


When the bearing is out of the compressor base, remove the snap ring the holds the connecting rod on the crank shaft bearing race. The easy way is to move the connecting rod in the highest position, and to use the right tools. Here you can see the snap ring unclipped. Now you can shove the crank shaft out with bearing cap and bearing, while the connecting rod stays in the base, and moves over the end of the crack shaft.


Here the crank shaft, still with bearing and cover on the left. The right hand side goes into a brass bushing in the compressor base.


Here the valve plate on the left and the cylinder head on the right. The valve plate is showing the pressure end.


Here the pressure end of the valve plate again, with the reed pressure valve. The posts on either end have springs on them. I have no idea how this ever worked in this condition.


Removing the bearing from the crank shaft. Since you cannot use a 3 legged puller, I had to use this two legged one. It is kind of big for this application, but it workes.


We will clean everything up, and then put the compressor back together.


1965 600 SWB #248
1968 6.3 #0347
1971 6.3 #5745 Euro
1979 6.9 #6857 Euro
1979 450SLC 5.0 EURO
1981 300SD
1989 560SEL
2003 CL600 Brabus T12 570HP
aplekker
Time to put the compressor back together.

Here an overview of all the parts.


And here a view of the expensive rebuild kit. That's all you get for more than $100.


First we knock the seal into the bearing cover. I put some gasket tacker on the side of the ring.


This is the cover with ring mounted. Maybe I should have painted this cover, although it is originally not as far as I remember.


This is the way the rings mount on the crank shaft. The one on the end has a chamfer, that points towards the end of the crank shaft (right in this picture).


And this is the way the clip goes onto the crank shaft. Just for show here, you have to wait until the shaft is in the housing.


The bearing gets heated on the bearing heater, and shoves easely on the crank shaft. Just in case I still give it some light blows with a brass shaft.


While holding the connecting rod in the housing, you move the shaft through the connecting rod, and also move the two rings plus clip onto the shaft. Of course we lube all sliding surfaces with motor oil.


Then the clip gets mounted on the crank shaft.


Here another view.


Now we move the bearing cap onto the bearing.


There is only one way to mount tha cap, the writing is upwards.


Of course we did not forget the sealing ring that goes around the cap.


Now we evenly turn the three bolts, while also knocking the cap with a brass shaft plus hammer.


A final light knock on the shaft and everything is seated. The shaft can be turned by hand easily.


The piston rings are not all the same. Obvious is the oil scrape ring on the bottom, but the third one down has a small ridge, that points towards the bottom of the piston. The piston ring in the background cannot be used, it is way too big.


Here the piston with rings.


After mounting the piston on the connecting rod by pushing in the wrist pin by hand, we position the bottom gasket.


The cylinder has to be positioned like this on the housing.


Laying the cylinder and compressor housing on the side, move the piston into the cylinder, while pressing the rings by hand. The cylinder and piston are lubed with motor oil.


Here the piston completely into the cylinder.


The M6 nuts on the bottom of the cylinder. You might have to leave the cylinder a little bit away from the housing in order to get the nuts on the studs.


Now the cylinder is mounted.


Detail of the valve plate. Here the seats of the suction valve.


Now the suction reed valve is in place.


And now the gasket in in postion.


The valve plate on top of the cylinder. Position the gasket through the holes.


On the other side of the valve plate the seat of the pressure valve.


The reed valve in place.


Spring plate and springs in position.


The spring plate has a bow, which mounts in this position.


Pressure end of the spring plate with reed valve.


And finally the head on the cylinder. I did not have the right plated bolts in stock, so temporarely I used unplated bolts. You can turn the shaft by hand using the nut on the end.


1965 600 SWB #248
1968 6.3 #0347
1971 6.3 #5745 Euro
1979 6.9 #6857 Euro
1979 450SLC 5.0 EURO
1981 300SD
1989 560SEL
2003 CL600 Brabus T12 570HP
Ron B
There are four basc types of Compressor,W100, 2 for W109 and W112 . Each are the same capacity but have different size pulleys . The W109 M116 compressor mounts to the sump and doesn't have the rear drive. Not too many other major differences otherwise. It really illustrates the need for regular oil changes too when I see those shots of the inside.[xx(]

quote:
12-14-2004, 11:49 PM #8
Tom Hanson
MBCA Member

What the heck, try to stuff a MB 6.9 liter V8 in it. What a machine that would be..
__________________
Tom Hanson
Orange County Section
Art Love
I would like to warn against the use of any type of pulley puller on the cast iron pulley of this unit. I have personally seen 3 pulleys broken. It is next to impossible to apply any standard pulley puller without one of the arms being against that paper thin machined edge which will crack with the slightest stress. The correct method of dislodging the pulley in my opinion is to support the pulley with your hand just above the workbench and strike the center shaft.

The design of this pulley fascinates me. The whole set up is balanced in a very strange way. The counterweight is on the same side as the machined edge. I showed it to an engineer once and he was also fascinated.
Art
aplekker
Art,

I do not disagree. As I stated in the description, DO NOT USE THE PULLER etc. I basically did what you suggested, hold the pulley and strike the center shaft. I use the puller to put the slightest amount of pressure on the pulley, and hit the puller bolt, which is basically the same as hitting the center shaft. After getting the puller finger tight, I might add another half a tunrn of pressure.

Again, I basically agree with you, just made the job a little easier with some pressure on the pulley.
I have removed at least three other pulleys of these compressors this way and never cracked one. However, I dropped one one the floor years ago and that took a big chunk out of the pulley.

1965 600 SWB #248
1968 6.3 #0347
1971 6.3 #5745 Euro
1979 6.9 #6857 Euro
1979 450SLC 5.0 EURO
1981 300SD
1989 560SEL
2003 CL600 Brabus T12 570HP
Kai McRae
I find these pictorial posts fascinating. They will be such a resource for us all.
Thanks again for all your efforts!

1971 6.3 - #5417 -
(LPG)
1982 230E - W123 (M102)
aplekker
Thanks, Kai.

Try to make it to the meet this year, the dollar is still low and you will have a good time!

1965 600 SWB #248
1968 6.3 #0347
1971 6.3 #5745 Euro
1979 6.9 #6857 Euro
1979 450SLC 5.0 EURO
1981 300SD
1989 560SEL
2003 CL600 Brabus T12 570HP
Kai McRae
Hey, my repair kit (000 586 01 13) came with a selection of 3 gaskets for the crankcase-barrell junction.

Thin, medium and thick.

I assume the selection is to allow for milled surfaces? or is it related to various compressions?

Mine has not been milled.

Albert, which did you use?

Anyone else have experience with this?


1971 6.3 - #5417 -
(LPG)
1982 230E - W123 (M102)
juan
How about the rings? Where did you find them?

Juan
juan
Is it ok to use the old rings? Will they seat again? [?]

Juan
Ron B
I am sure mercedes stock the rings Juan, but if there is a small engine shop near you they may the correct sizes. Some thing like a lawn mower or chain saw engine?.
As long as the ring gap isn't too large you should be able to reuse the old rings.


quote:
12-14-2004, 11:49 PM #8
Tom Hanson
MBCA Member

What the heck, try to stuff a MB 6.9 liter V8 in it. What a machine that would be..
__________________
Tom Hanson
Orange County Section
juan
Thanks Ron!

Juan
tjryan
Isn't there some seal between the compressor and the power steering pump? Anybody got pic's of what this looks like/tips for replacement?
Thanks
Tim

TimRyan
71 300sel6.3
Chris Johnson
Hi Tim,

There is an O-ring on the nose of the PS pump that slides into the rear of the air compressor that provides a seal to the outside world. Is this the one you are refering to?

Chris Johnson
If you aren't constantly impressed with your car, then it needs fixing.
100.012-12-000790
100.012-12-000867
www.300SE.org
Ron B
yes there is,you can buy them anywhere. it's a dual lip seal with two lips so dont fit a single lip seal in there because it will work fro a few months then fail.
Here similar seal in Alberts pic above.This is the outer shaft seal BTW.


quote:
12-14-2004, 11:49 PM #8
Tom Hanson
MBCA Member

What the heck, try to stuff a MB 6.9 liter V8 in it. What a machine that would be..
__________________
Tom Hanson
Orange County Section
Chris Johnson
This is not so. There is no shaft seal on the rear of the pump. In fact, there is a hole through the body of the pump to the rear side to provide some mist lubrication to the shaft coupling between the air compressor and the PS pump.

If there is leaking at the joint between the air compressor and the PS pump, it is the O-ring on the nose of the PS pump.

Chris Johnson
If you aren't constantly impressed with your car, then it needs fixing.
100.012-12-000790
100.012-12-000867
www.300SE.org
Art Love
I looked this up this morning but didn't have time to post a reply. I'm a bit intrigued by what I found in my M100 Parts Manual. The O ring is shown in Group 13. It's Part 56 way over on the left side in front of the power steering pump.


But when I looked it up to provide you with a Part Number which is 001 997 72 45, it lists it as only applicable to the 100.980 motor used in the 600, not the 100.981 in the 300SEL 6.3. Don't know if you can read it in the <80Kb image, but it is the third number down. I haven't had an air pump and power steering pump from a 6.3 apart in recent memory, so I don't know if this is correct or not, but that is what my Parts Manual clearly says.


Art
pjtigger
The 6.3 pump does have that "O" ring. For info to overhaul the PS pump you need the following "O" rings

2x64 O ring
2x23 (2) O ring
3x47 O ring
2.5x13 O ring
2x8 O ring

When i purchased the rings there was a minimum order so i have a number of "Kits" - i did think about putting them up on Ebay but have not got round to it yet
Art Love
Paul,
Justin may be interested in a "kit" or two. Send me a PE artlove@bigpond.net.au with prices.
Thanks,
Art
Kai McRae
Having just done this job and calmed down a bit I concur. The O ring in question is part 56, roughly 3 or 3.5 x 45ish if I remember. I sourced mine locally after checking with Tom re. availability.

The ring is not available separately from the Classic Centre. It comes in a kit for the PS pump I think. I wasnt breaking mine down and didnt want to buy the whole kit for the o ring.

It wasnt a dual lip seal simply a round profile O ring. I can post the kit part number from Tom tommorow if need be.

1971 6.3 - #5417 -
(LPG)
1982 230E - W123 (M102)
tjryan
The PS fluid (red ATF) is looking a little murky/brownish. So I suspect that the engine oil is getting in there.

Is this a classic center type part, or can I get this seal anywhere? I haven't had the pump off yet, not sure of its design. Thanks

Tim

TimRyan
71 300sel6.3
tjryan
sorry, didn't see the second page of replies before my question. All is clear.
Thanks
Tim

TimRyan
71 300sel6.3
Chris Johnson
Hi Tim,

I think it is very unlikely that engine oil is getting into the PS system as there is a drain back to the engine between the compressor and the PS pump. The PS pump generates much higher fluid pressures than the engine ever will, so if there was a leak you would see PS fluid in the engine.

More likely is that the PS fluid is very old and the filter has never been replaced. Dump all the PS fluid and replace the filter, operate the system again, and dump the PS fluid again. Then fill it again.

Chris Johnson
If you aren't constantly impressed with your car, then it needs fixing.
100.012-12-000790
100.012-12-000867
www.300SE.org
Ron B
Chris, as a matter of interest I have changed a lot of these seals where the engine oil has reached the powersteering reservoir. I have done two for Robert Fulton on both of his 6.3's and he can attest to the fact that the engine oil goes everywhere as the pressure builds in the reservoir and covers the left hand side of the car. [:D][:D]
The high pressure side of the vickers pump is below the reservoir and the engine oil comes through the pumps seal because it is designed to hold a lower pressure in ,not stop higher pressure coming for the other side.
It's not unusual on a 6.3 and the symptom is a lot of black oil in the reservoir and dripping under the car.
The two O rings are simply low pressure seals and basically just seal the pump to the compressor. They wont prevent the oil leaking from the compressor to the power steering because they are on the power steer pump flange,not the compressor shaft.
The EPC incidentally doesn't list he lip seal which is why I seem to be getting stick from others here[:(!]. i am not sure if the seal kit# A000586 26 46 contains this, because I simply go to the local seal place here and buy a new one for $8. But,be aware,if you dont replace it ,the oil WILL go from the compressor to the power steer reservoir.

quote:
12-14-2004, 11:49 PM #8
Tom Hanson
MBCA Member

What the heck, try to stuff a MB 6.9 liter V8 in it. What a machine that would be..
__________________
Tom Hanson
Orange County Section
Chris Johnson
There simply is no seal on the rear of the compressor.

There is a seal in the front of the PS pump shaft, but there is also an oil passage way straight back to the engine sump between the compressor and the pump, so there is no oil pressure there on the compressor side of the pump seal.

Of course, all this is predicated on the passageway for return oil flow being open so that the oil can actually flow. If that return path is blocked then the front of the PS pump might see full engine oil pressure. I'll have another look at a PS pump tomorrow, but right now I remain of the opinion that the pressure on the pump side of the pump shaft seal is higher than any pressure that might be in the engine sump.

Chris Johnson
If you aren't constantly impressed with your car, then it needs fixing.
100.012-12-000790
100.012-12-000867
www.300SE.org
Chris Johnson
I looked at the PS pump. The oil pressure on the pump side of the shaft seal is equivalent to whatever the amount of oil in the reservor imposes. Not a lot.

Since there is a large drain between the compressor and the PS pump that goes back to the engine sump and the sump is ventilated back through the air controller, there wouldn't be a positive pressure between the compressor and the pump unless the drain path was blocked. Blockage seems quite unlikely considering the size of the path.

Chris Johnson
If you aren't constantly impressed with your car, then it needs fixing.
100.012-12-000790
100.012-12-000867
www.300SE.org
Art Love
I checked with Tom Hanson regarding what Kai posted about the availability of that O ring - 001 997 72 45. Tom replied that it IS available as a separate part. I've asked him for a price and shall post it when I have it. Tom commented that the odd seal in the PS pump is the "radial seal between the two pumps", which is what I presume Chris is referring to as the "seal in the front of the PS pump shaft". Air compressor kit 000 686 01 13 that Albert posted a picture of is $155 and the PS pump kit 000 586 26 46 that Ron referred to is $53. I presume that 000 586 26 46 includes the radial seal which I guess from what Ron is saying is the seal he buys locally for $8. I'm happy to be corrected on any of my presumptions.
Art
Ron B
Art,radial seal is what the lip seal translates in english from German and it's the seal which I am refering too. I would be most interested to see the compressor which runs without one as Chris is so adamant about. If you dont replace it ,and it needs replacing every so often you get the oil running into the power steering. Going back through the archives ,one could find several instances of it here,including I think Mike getting one replaced at a Lodestar meeting. [:)][:)]
I wouldn't pay those prices for the vickers pump seals when they are available locally at several places within 5 minutes of me. The design of the vickers pump means that it is extremely rare for the fluid to run from the high side out of the drive pulley side of the shaft.But,as i have already said. it is common for the oil from the compressor to be pumped into the power steering from the air compressor when the lip seal fails.
Looking at a picture in the manuals I can see that it doesn't show the seal ,a generic picture in fact used across the range... now I know why everyone is trying to tell me that there is no seal there. If you dont pull one apart you wont see it will you ?[:D][:D][:D]


quote:
12-14-2004, 11:49 PM #8
Tom Hanson
MBCA Member

What the heck, try to stuff a MB 6.9 liter V8 in it. What a machine that would be..
__________________
Tom Hanson
Orange County Section
Kai McRae
The only seal between the pump and compressor on mine was a single O ring with the dimensions already posted.

Tom did advise me that the seal only came in the kit, however there may have been some confusion about which seal was being discussed.

Ron,

Where exactly does this mystery lip seal sit?

Alberts 10th picture down is the only one which shows this area.

The O ring I replaced mounted to the PS pump body (in the channel)and sealed against the smooth inner face of the compressor body in this pic. This was the only seal on mine.

To replace this other seal you speak of, does this involve opening the PS pump?

1971 6.3 - #5417 -
(LPG)
1982 230E - W123 (M102)
Chris Johnson
quote:
I would be most interested to see the compressor which runs without one as Chris is so adamant about.


Ron, please post a photo of this rear compressor seal. I will bow down and kiss your feet (figuratively, anyway). Of course, if it isn't there, then reciprocity is appropriate.[:D]

Also, please address how the engine is pumping oil into the PS pump while there is that drain back bore into the engine sump between the pump and the compressor. I've only been doing this stuff for 35 years, as opposed to your 40 so I'm still quite willing to learn something new.

Chris Johnson
If you aren't constantly impressed with your car, then it needs fixing.
100.012-12-000790
100.012-12-000867
www.300SE.org
Art Love
Nothing like a bit of a stoush to stimulate my education. As one of the moderators, I have decided to put everything into perspective to avoid any genuflexing. Tim's question has raised a point that Albert really did not cover in his excellent posting, and that is the rear part of the air compressor crank and its lubrication and sealing. The mechanics among you who already know all this do not need to read further. This is written for the mechanically ignorant like me.

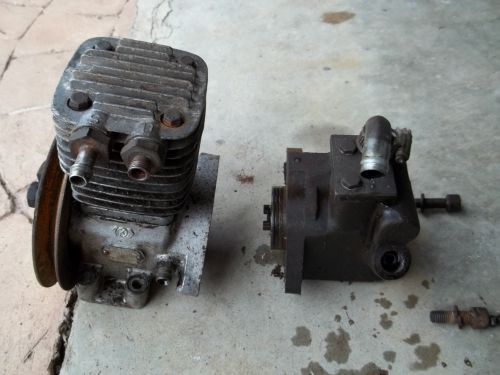
Firstly, to follow up on my last post, the price of 001 997 72 45, the O ring between the air compressor and the power steering housings is $5.50 retail. Now to how a moderator will deal with this issue. Firstly, go into the garage and get a few examples of the items under dispute. Take an intact pair and pull them apart to demonstrate that the moderator is not biased and not a magician. This pair are clearly not from a 6.3, but they will do for the sake of the argument.


Take trusty Allen Key wrench and separate the two components in question.


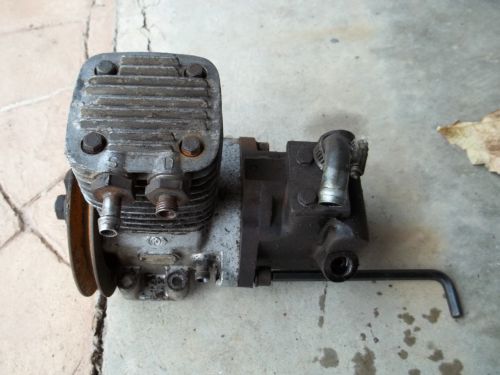
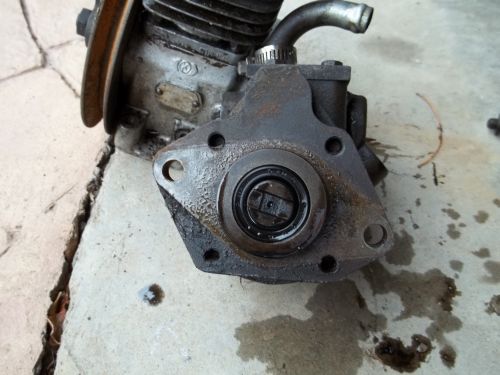
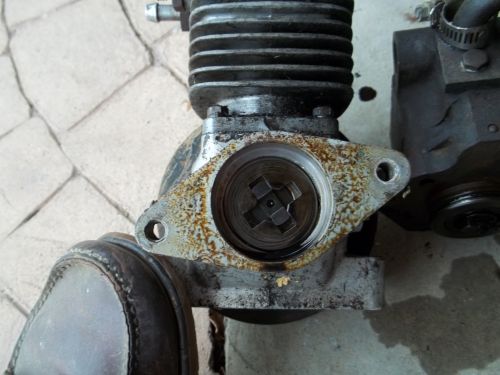
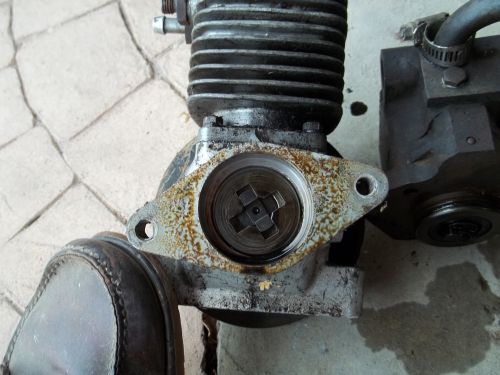
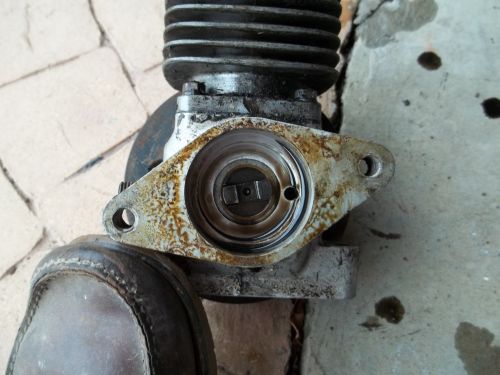
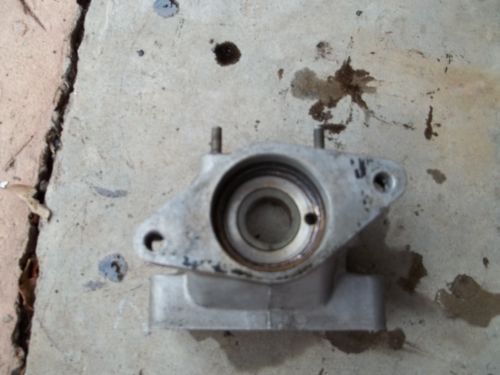
Now here is what you see if you look at the front of the power steering pump.


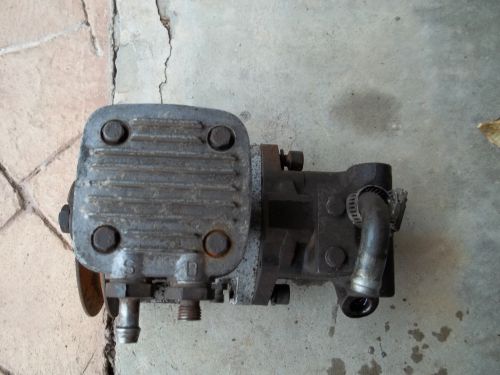
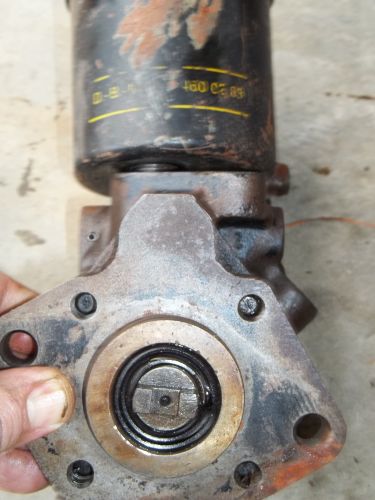
Here is a different one off a 6.3 to show they are the same. The radial seals are "shot".


I believe that the rubber seal around the drive shaft is the radial seal/lip seal that Tom Hanson and Ron are talking about - Ron, correct me if I am wrong.

Here are a couple of angled views showing 001 997 72 45 which is flattened by use and age. This seal between the two housings stops oil around the drive coupling from leaking to the outside world.


The radial seal prevents oil around the coupling and power steering fluid in the power steering pump from mixing. I have no idea which would be at higher pressure and shall not get into that argument, because I would not have a clue.

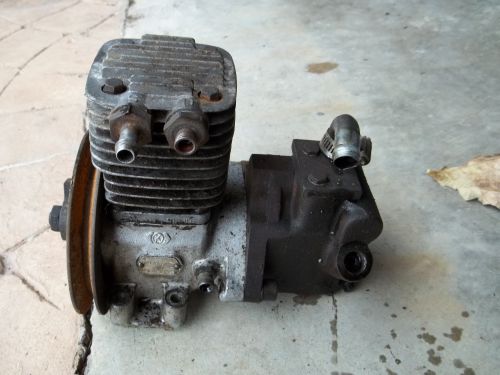
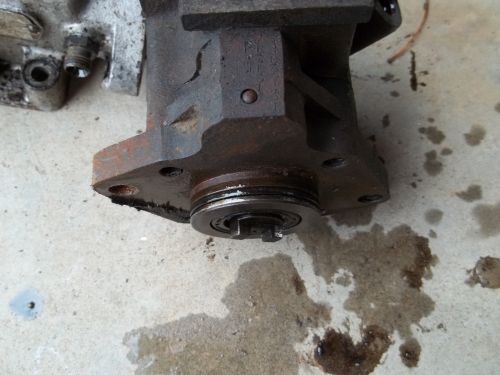
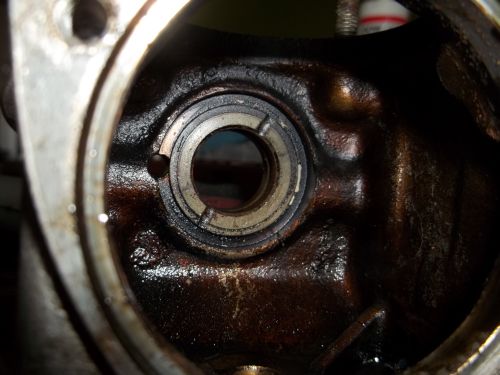
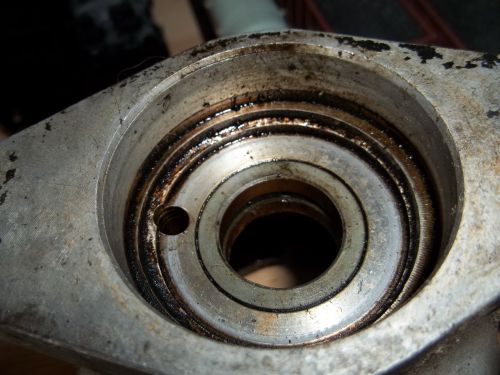
Now here is the rear of the air compressor, an area only shown once in Albert's pictures as pointed out by Kai amd previously noted by me when I also looked for the same reason.


There is a drive coupling between the two shafts which obscures the view.


So, I have taken it out.


Now you can see the rear of the crank in its bearing shell and the oil return hole that Chris is talking about on the right hand side, and I'll come back to that later.


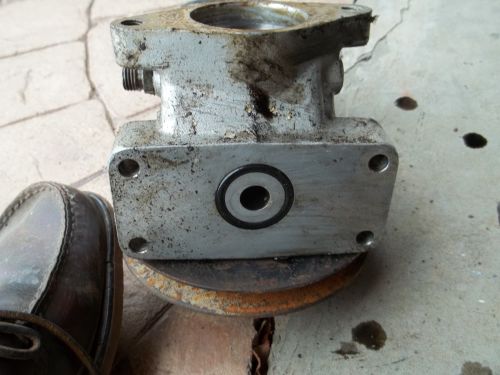
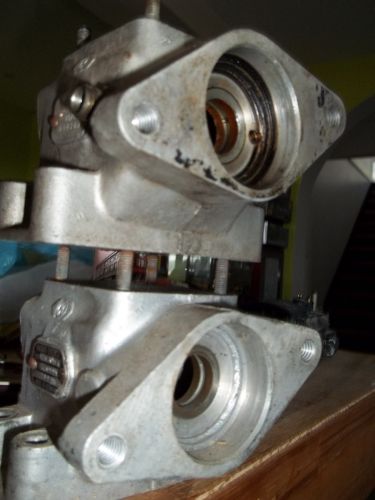
Here is a similar air compressor pump body (sump) with the crank out.


Here we are looking at the bottom of the air compressor sump to show the large drain hole for the sump oil with its surrounding O ring for return of the air compressor sump oil to the engine sump via the hollow mounting bracket that the air compressor sits on.


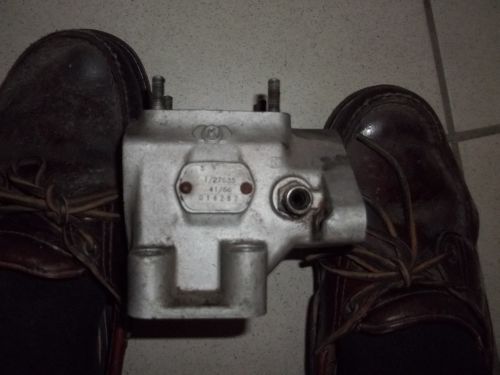
This picture shows an outide view of one of these air compressor sump bodies and you will notice that the high pressure oil feed line from the top of the oil filter on this body is on the opposite side to where it is in the 6.3 and 600, explaining one reason why M-B list more than one version of the air compressor. The one I pulled apart for this dissertation is similar.


Now this is what I found interesting. Knorr who make these pumps don't make a different casting for the sumps for inside or outside feed, they make the housing so it can be drilled and tapped from either side to reach the rear crank bearing.


So the high pressure oil input to the air compressor sump feeds to a circular groove in the housing where the rear bearing is mounted. From there, it feeds through 3 small holes in the bearing shell, set at 120 degrees apart. This is the same type of lubrication used in the fan coupling that Justin and I rebuilt off the M189 and used elsewhere. If these tiny holes or the circular groove become plugged with rubbish, the lubrication of the pump crank will fail. I don't think Albert covered this. The same would apply if the channel between the holes in the crank shaft bearing surfaces became blocked. I could not see any other holes for entry of oil into the air compressor sump from the high pressure line.

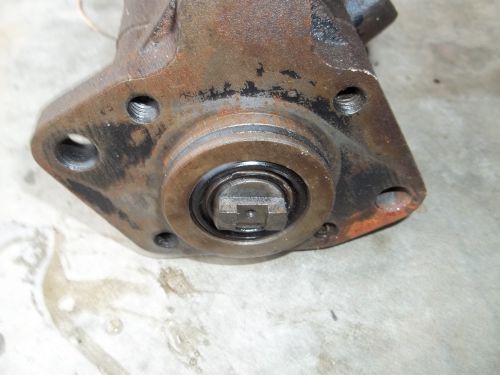
You can see one of the 3 holes here at 12 o'clock.


And by turning the housing upside down, the other 2 here at 10 and 2 o'clock. Note also the groove in which these holes lie which lines up with the small hole in the rear bearing face of the crank shaft.


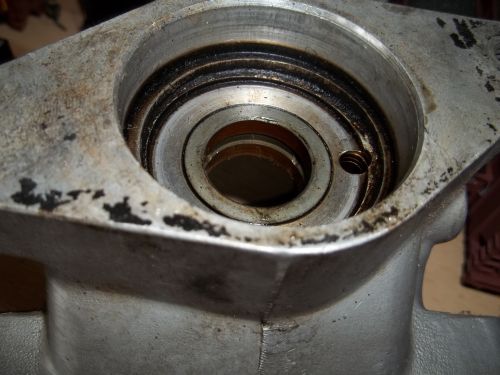
So, unless I missed something (which is quite possible), the oil all feeds in via this route and can spread equally either forward through the hole in the crank into the sump via the front bearing surface or rearward into the coupling housing. That which feeds rearward returns to the sump via the large hole set at 3 or 9 o'clock, depending on whether the feed line comes from the outside of the pump or the inside respecively. The hole is opposite the side of the inflow fitting and channel to the bearing. To my mind, the position of this hole would mean that the coupling housing would always be half full of oil, whereas, the sump itself would have very little oil because its drain is in the middle of its bottom side.

Here are a couple of air compressor housings to show the opposite set up of the oil input line and drain holes.


So, in a sense, Chris is totally correct in saying "There simply is no seal on the rear of the compressor." But, if you count the coupling chamber as part of the compressor sump which it is from the oil's point of view, then the seal that Ron is talking about is between the compressor and the PS pump. Strictly speaking, it is in the front of the PS pump, not in the air compressor, but it is in direct contact with the air compressor sump oil. The front of the PS pump acts as the rear of the air compressor in this set up where the PS pump drive is from the rear of the air compressor, otherwise oil would just spew out everywhere because there is no back wall on the air pump over the rear bearing.

Did I get this all right and does it settle the argument?
[:)]Art
Chris Johnson
Hello Art,

Thank you very much for taking the time to research this and post the write-up and pictures. I think this makes it possible for anybody reading all this to understand how it all works and what is going on in there.

It is my opinion that it doesn't really matter who is right, but it very much matters what is right. Ron and I can have a little fun giving each other a bad time but, ultimately, the facts need to be established otherwise this is nothing more than a social board, and I don't think any of us want to limit it to that. I think Ron is refering to the seal in the front of the PS pump (I'm sure he will clarify that), but I also think that it is important for other readers to understand that it really is in the front of the PS pump, not in the rear of the compressor.

At this point, what I am most interested in is how engine oil could be pumped into the PS pump. I have never seen this problem. The only scenario I can see that would cause this is if the return to the engine's sump were completely blocked. Since the compressor is force-fed oil by the engine's oil pump, the compressor and the front seal in the PS pump could experience engine oil pressures as high as 70 PSI (the rating of the oil pressure relief valve in the engine) if the oil could not return to the engine.

I can also envision another very unlikely scenario where the PS pump could suck engine oil past the seal, but this would require that the feed from the PS fluid tank be almost totally blocked.

In either case, the seal in the pump is not the problem, though it might appear as a symptom. You and I both have old seals that are approaching 50 years of age and don't have problems with engine oil in the PS system.

I'll be out until late this evening, but I look forward to reading Ron's thoughts on this.

Chris Johnson
If you aren't constantly impressed with your car, then it needs fixing.
100.012-12-000790
100.012-12-000867
www.300SE.org
Ron B
Chris, As I pointed out, the seals on all vickers pumps are designed to hold pressure in .
So.. My own thoughts about the Compressor drain is that although the drain is large and it dumps directly into the bracket , it is the sheer volume of oil that is being pumped into the compressor housing which allows this to happen . When the lip seal dies, that oil is Sucked into the vickers pump via the low pressure side of the pump. And when it happens the oil is pouring out of the reservioir even at idle. Hot engine oil is easily sighted ..[:D][:D] So,when the owner doesn't realize (or never bothers to look in the reservoir) it gets worse,a lot worse when the car is driven . That volume of oil becomes huge . In a matter of minutes most of the trans fluid in the steering is displaced and the engine oil takes over. I haven't seen any steering box seal failures but i doubt the flex hoses like it much.
The other thing to watch for when reassembling is to ensure that the two thick washers are against the pump ,between the bracket and the pump housing. If not,the pump housing will leak.
none of this stuff is in the manuals etc, but then they were written when the components were nice and new.. without several hundred thousands of miles on them.

On the matter of the oil volume,I dont know what sort of volume the engines pump can deliver but when I burst a feed line a couple of years ago ,the amount of oil sprayed all over the car in seconds was amazing. Even on a M116 ,which I had one burst at idle , the oil pumped out went everywhere before the engine could be shut down.

quote:
12-14-2004, 11:49 PM #8
Tom Hanson
MBCA Member

What the heck, try to stuff a MB 6.9 liter V8 in it. What a machine that would be..
__________________
Tom Hanson
Orange County Section
Ron B
Art, thats the seal. it should be dual lip seal . Using a single lip seal ,of which i have found a few on the compressors which had failed, is not a good idea.
The outer O ring,generally doesn't do much because the fit between the housings is pretty good. a regular nitrile ring will work OK.
Do you want to sell those M189 bits?[:D]


quote:
12-14-2004, 11:49 PM #8
Tom Hanson
MBCA Member

What the heck, try to stuff a MB 6.9 liter V8 in it. What a machine that would be..
__________________
Tom Hanson
Orange County Section
Art Love
Not while I'm still running the W112 coupe and rebuilding the green car.

I'm not sure that I want to pull a power steering pump apart just at the moment to see if the other side of that radial seal is the inflow side of the power steering pump, not the pressure side, but, if it is, then what Ron says makes sense to me. There certainly is a lot of oil passing through the sump/coupling housing of the air compressor. The radial seal, while physically in the front of the power steering pump, is effectively the rear oil seal of the air compressor - an interesting Anglo-German collaborative design effort between Vickers and Knorr[;)][:D], even if they could not agree on the bolt specs. If the "suction" side of the power steering pump is behind that radial seal, it would effectively have a lower pressure than the "nil" pressure in the coupling without the necessity of a blocked oil return in the air compressor and suck oil if the seal failed. If the pressure side of the power steering pump is on the other side of that radial seal, then failure of the seal would result in power steering oil being pumped into the air compressor sump via the coupling housing. If there is neither suction or pressure on the power steering side of the radial seal, then its failure would be fairly benign unless the failure was gross.

Someone want to pull a power steering pump apart[?] Paul Germy will have done so fairly recently, maybe he can tell me[:)] if no one else knows. I'll be doing it with Justin as well at some stage, but I don't think it is on his immediate agenda. It's all an education for me and I hope other readers will find it interesting as well including Tim and Kai.
Art
Art Love
I was talking to Justin yesterday about these air compressors. He has exactly the same thing on his trucks, just bigger. He showed me one disassembled from one of his trucks. He said the main problem with these air cooled pumps is that the bore and the piston become oval with time. He said that once they begin to pump oil, repairing them using the existing piston, even with new rings, results in only a short term fix before they start pumping oil again. He said that even though he measured the truck piston and bore and they were OK, his repair with new rings was short lived. His enquiries with his local expert revealed that the metal distorts as the pump gets hot and things become oval. Only solutions if that is the case are to buy a new pump or to bore the cylinder and put in an oversize piston. As these pumps are NLA new, once these is a lot of blow by, seems a rebore and replacement piston and rings will be the only answer.

So grab every one of these pumps from wrecks before they are crushed. I do not know if Knorr are able to supply oversize pistons or whether we will be forced to look elsewhere. I just post this for general advice. Overall, these little pumps are very durable with most still doing an adequate job after 40 years.
Art
pjtigger
Art

Your in luck - i remembered to take a picture of the PS pump when i overhauled it.


Hope this helps show how it works
Art Love
Thanks Paul.
I can see how it works in principle, but not in detail. Justin is not planning to pull one apart in the near future, so I'll have to remain ignorant for the time being. That set of O rings you listed does not seem to include the radial seal. I presume it is in addition to the O rings you list.
Art
pjtigger
Yes - the PS has a 22x35x7 seal
Cardock
Can anyone confirm these measurements are correct. I measured the seal on my 600 p/s pump and it seemed more like 36/26/7. Are there a range of pump sizes, could the previous post relate to a smaller pump ? The part doesn't seem to be listed as a stand alone item on EPC so if anyone had a part no. that would be great (if it exists)

Gar
pjtigger
The size was for the 6.3 pump - could the 600 one be a different pump ?.
Art Love
The pumps are different. 100 460 03 80 for the 600 and 189 460 06 80 for the 6.3. Without going down into the garage and lifting bonnets, I don't know what the external differences are, but I would not be surprised if the 600 pump were bigger and worked at a higher pressure. I don't have a part number for the 600 radial seal.
Art
Mercedes300sel
Hi i have a 1970 300SEL 6.3 and I have taken the compressor out and apart and the crank is very worn because of the blocked lubrication lines, is there any thing I can do to repair it.
Regards Pétur
cth350
Used pumps are around. Do be careful with pulley on yours as been probably said three times already on this thread, but it bears repeating as a used pump may or may not have a good one.

Also, anybody shipping a pump should ensure that it is packed immobilized and such that if dropped, the pulley won't suffer a catastrophic shock and crack. A few cm of styrofoam packing is a good thing.

-CTH
Art Love
If you know anyone in Iceland who is good with motor bikes or works on engines in general, show them the crank shaft for advice. There is nothing fancy regarding this small "engine" as far as the crank is concerned. It would depend on whether the wear is through the hardening and the availability of undersize bearings if the bearing surfaces are not beyond repair. If the crank is beyond repair, then you would need to buy a second hand pump or check with the Classic Center if they can still supply a new pump and at what price. They were still available new in the 1990's but I have not enquired since.
Art
Mercedes300sel
Thanks for the quick answer I appreciated, I will find some experts here in Iceland to take a look at it for me thanks again.
Pétur
Jack English
Petur, earlier in the thread mention is made of the "double lipped seal." I may have bought the last one available from Tom Hanson at the Classic Center recently. Seems these are only used on the W109 cars with the two pumps linked. Perhaps Tom was successful in having a new batch produced. Good Luck.

Jack English
300SEL 6.3 #4768
Mercedes300sel
Thanks. I Will maybe find some thing at my dealership or maybe aftermarket. And thanks again for the advice [:)] I appreciate

Pétur
werminghausen
I just read through the compressor repair. Nice. What I am missing is the bronze bushings that potentially need to be exchanged if worn.
This is for a higher mileage compressor or one that had problems with lubrication.
I have seem some of the compressors in not that great shape as the one here. Some have 2/10mm play in the bronze bushings.
Knorr was using 2 types of bushings.. High leaded Bronze (15% Pb) for the softer Crankshaft bushings and 'Rotguss'for the hard piston pin in the piston rod. These bronze bushings are not part of the MB kit.
These bushings need to be machined with 2/100 play for the rotating shaft and press seat for the seat itself (2/100).
Typically the cylinder requires some honing and piston with new rings for a higher mileage compressor.
Martin

werminghausen
Here is another aspect to consider.
Testing the check valves

I have renovated various compressors. In my humble experience the tightness of the compressor determines the power of the compression and suction. This means if the check valves are not closing properly even the best renovated compressor is not pumping well.
New check valves sometimes are not tight enough and I developed my own testing protocol. I have not experienced how slightly leaking new check valves are improving or not over time. Whenever I renovate these compressors I am testing and work as long as it takes to have the valves working properly.
The tightness of the piston rings/cylinder is important too but the check valves come first.

Martin
Return to Forum