| Last Post |

Ingvar Froroth
|
|
6/27/2023 1:50 PM

|
Please note that https://600airsuspensionshop.com/ is a fantastic web shop! Many Thanks Martin :)
109.018.12 1968 Bronze Braun (M100 in good shape) 126.039.1A 1988 Dunkelblau (M117 so a bit slower) + A few other MBs used for daily transport
|
|
|
|
werminghausen
|
|
6/14/2018 9:19 AM
|
|
I just read this.
If need is I have the rectangular custom seals for the M12 x 1.5 air fittings.
Small and large custom rings. I am using these for each of the many air suspension fittings during rebuilding these units.
The M14 x 1.5 fittings used on the 600 regulator and W112/109/100 rear spring connectors have bigger size seal rings and I also have them if needed, rectangular inner ring.
Best, Martin
|
|
|
|
mookschank
|
|
6/22/2017 9:11 AM
|
|
Thanks for the info guys, have emailed Tom and he is arranging for postage of the items over, cheers.
|
|
|
|
Art Love
|
|
6/8/2017 6:09 PM
|
|
Tom Hanson had the Schrader valves in stock and be aware that you only need 3, not 4, because the rear bellows are connected by a cross pipe and only the left rear tank has the 12mm fitting.
Art
|
|
|
|
GeraldK
|
|
6/8/2017 11:53 AM
|
|
I believe the thread for the schrader valve is M12x1.5mm. If you wanted to order from Mercedes the part number for the valve is 112-320-06-58. Probably around $10US.
Gerald
1969 300 SEL 6.3 #0795
1959 190 SL
Calgary, AB
|
|
|
|
mookschank
|
|
6/8/2017 6:39 AM
|
|
Hi all,
I now have to get the valve gear rebuilt. In preparing for this, I would like to insert the schrader valve fittings to keep the car up.
Does anyone know the thread type of the air bellows for the schrader valve fitting to screw into? I will be looking to source the correct fitting from somewhere.
|
|
|
|
orlandofl
|
|
4/7/2017 11:23 AM
|
Awesome write up! I love the sense of humor you have with the extra pictures. I'm going to do a write up similar to this one on my 6.3 for the window tint I having www.orlandocustomwindowtinting.com do.
|
|
|
|
mookschank
|
|
3/11/2017 6:28 AM
|
|
Thanks for the replies guys.
The prices were from MB spares so have hit a wall with that one. [:0] Might try the USA route...
Bizarrely, the square inner o-rings were missing completely when I pulled the fittings out. I've measured the fitting inner diameters and air holes with the vernier and hope to get something that functions as intended.
Update:
I bought a bunch of OEM seals from the USA, except for the small fitting outer round o-rings as they were $25 each - ouch. When looking for these o-rings, I noticed they have the same part # with an electronic injector seal so hence would be made of Viton though I'm not sure on hardness. Anyhow, decided to take the punt and I went to the seal shop and bought some Viton o-ring round seals at about 0.50 cents each.
And for reference for anyone, I measured up the OEM seals and they are:-
Small square inner: 1.98mm width/height, 1.5mm thick, 10.55mm outer dia.
Large square inner: 1.98mm width/height, 1.7mm thick, 12.95mm outer dia.
Large round o-ring: 2.14mm width, 14.37 outer dia.
Small round o-ring (not OEM, ones I got from seal shop): 1.94mm width, 12mm outer dia.
|
|
|
|

abl567
|
|
3/10/2017 10:39 PM
|
|
Also try MB Spares in Canberra, If I remember correctly I bought some from them for about $8 each, Part number A 112 997 04 40
or
http://www.genuinemercedesparts.com/oem-parts/mercedes-benz-seal-ring-vlrub-1129970440
https://www.mbpartsexpress.com/oem-parts/mercedes-benz-seal-ring-vlrub-1129970440
Tom is the most reliable though.
Ant
300SEL
6.3 #2723, my first classic Benz
3.5 #8659, my second.
2 to go...
|
|
|
|
Art Love
|
|
3/10/2017 10:08 PM
|
|
Suggest you check with Tom Hanson at the M-B Classic Center in Irvine, California for pricing for the seals rather than Australia. You can also check with Martin Werminghausen in Massachusetts because I am sure that Martin will have had them reproduced. Google "600 air suspension" and Martin should come up. If you want to try your local seal supplier, I suggest you take one of the used square seals that you have to see if they have anything similar. The ID and OD should be preserved. The depth is the same as the thickness, ie they have a square profile.
Art
|
|
|
|
mookschank
|
|
3/10/2017 5:20 PM
|
Hi everyone, First post here for me here, so here goes.... Just bought a W109 and am putting it back on the road. Have replaced all the air bags and learnt a couple of things about them. Instead of the steel fabrication for the airbags I did a plywood version (see pic if i have worked out how to upload pics ok). I'm only doing 4 all up so plywood will just see me out. Also, putting the new airbag back on the ring, after stuffing around trying to squeeze it in, I worked out I could just sit the air bag on a 3 inch cube of wood on the table and just squeeze the ring down. The airbag elongates when you do this then goes pop as it beds into place - easy as. I do have question for the forum if someone can help me. I have tried to source the o-rings for the airbags and have been quoted $48 AUD for the outer and $36 for the inner each! That's hundreds just to do the 4 airbags! Can anyone give me the dimensions for the inner square round o-ring? I'm planning to go to a seal shop and buy them. I already have the outers, they're straight forward nitrile o-rings. I'm thinking the worse case scenario from not buying MB seals is that they leak and will have to redo. The pneumatic connection system is nothing really unique though so it shouldn't be a problem finding the right seals. 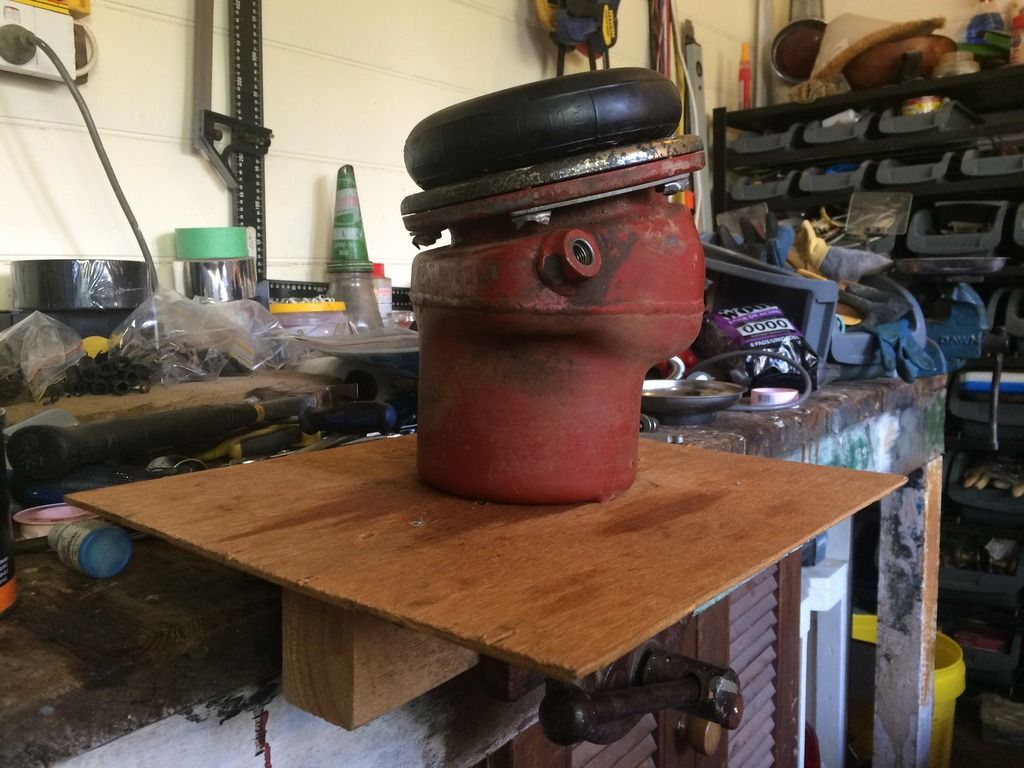 Thank you, Mook.
|
|
|
|
6.3Nut
|
|
7/18/2016 10:04 AM
|
quote:
Originally posted by Art Love
I am not aware of any reason why you cannot use the outer end of the lower control arm to lift the corner of the car. You would need some timber between the jack and the metal. It is not a normal location to jack a car, so it is your call.
Thanks Art. I was only worried about damaging the front-end, but your comment gives me confidence.[^][:)] There cars and then there are BABIES! 1969 Euro Model 10901812000931
|
|
|
|
Art Love
|
|
7/18/2016 6:36 AM
|
|
I am not aware of any reason why you cannot use the outer end of the lower control arm to lift the corner of the car. You would need some timber between the jack and the metal. It is not a normal location to jack a car, so it is your call.
|
|
|
|
6.3Nut
|
|
7/17/2016 11:09 PM
|
quote:
Originally posted by benz_head
I have to think about this.....but I don't think that's stable enough. What work do you need to do?
I would build a solid wood platform and put it under the engine cradle, using jack stands as backup. Or, dig a pit under it in your yard. I don't get under a car unless I can kick it repeatedly and it won't budge. You cannot trust airbags....ask Karl Middelhauve.
benz_head
#1349
Benz-head, thanks for the concern. The stands I am talking about are solid block of 6x6 wood and then top and bottom have 12x12X2 wood planks so the structure is very solid. As a back up I will put jack stands under the car. Man, I am as scared of raised cars as any, so I always make sure the setup is secure with redundancy - Petroleum Engineering made me very cautious[:D]. So my question still is, can I lift the tires from the control arm to slide the stands under the tires. There cars and then there are BABIES! 1969 Euro Model 10901812000931
|
|
|
|
benz_head
|
|
7/17/2016 10:42 PM
|
|
I have to think about this.....but I don't think that's stable enough. What work do you need to do?
I would build a solid wood platform and put it under the engine cradle, using jack stands as backup. Or, dig a pit under it in your yard. I don't get under a car unless I can kick it repeatedly and it won't budge. You cannot trust airbags....ask Karl Middelhauve.
benz_head
#1349
|
|
|
|
6.3Nut
|
|
7/17/2016 5:04 PM
|
|
Hello! Guys I have to put the front wheels on 11" stands to work under the car, so was wondering if it is OK to lift each front wheel from the control arm, place the stand and then release the jack. I want your expert opinion before I adventure this ave.
Of course the air bellows will have air in them.
There cars and then there are BABIES!
1969 Euro Model
10901812000931
|
|
|
|
6.3Nut
|
|
5/15/2016 11:49 PM
|
[quote] Originally posted by Art LoveThe new buffers arrived today, so we got on with replacing the front bellows units. Here are the buffers going in. This is a bit of a fiddle because the bottom of the rubber is wider than the top, as are the metal cylinders they go in. Plenty of rubber grease[:)].  [quote] Hello Art, what is the part number for the buffers. I have searched the entire EPC for my car and it only mentions emergency running buffers A1125830084. There cars and then there are BABIES! 1969 Euro Model 10901812000931
|
|
|
|
Art Love
|
|
2/17/2016 7:35 PM
|
|
OK, here is another update. I ordered some left and right hand thread 6mm ball joints from J W Winco in WI, from whom I have purchased them in the past only to be advised that their German supplier would no longer let them sell them outside the USA. So I contacted the German manufacturer, Otto Ganter GmbH & Co. KG in Furtwangen asking if they had an Australian outlet.
At the same time, Phil Solowski of J W Winco had kindly sent my order detail on to Glaiza Stehle of Export Sales at Otto Ganter who contacted me directly with details of their Australian outlet and also sent the Australian business a copy of my order.
That business, D&D Barry Pty Ltd of 2/20 Sedgwick St, Smeaton Grange NSW 2567 through their manager, Richard Cameron then send me a proforma invoice for the order in Australian dollars. The whole business was conducted within 48 hours. Of note is the cost of the units in A$ was within 1 cent of the US cost based on the current exchange rate with just the additional Australian GST then added. Allowing for the difference in freight costs, the cost is much the same.
So American, European and Australian members of this Group now have the details of suppliers of these ball joints in their regions.
Art
|
|
|
|
Art Love
|
|
2/15/2016 11:43 PM
|
|
My pleasure; I am pleased you have had a successful outcome. As an aside, I spent yesterday afternoon changing all three air valves on #765. The ones on the car had been "repaired" in Melbourne about 10 years ago and the car was on its knees after 2-3 days - very annoying! Jim Jones at Three Point very kindly offered me use of a spare hoist yesterday - I had been putting the job off for months having done it on stands in the past. So I grabbed the opportunity and put on three valves that I have had repaired by Martin Werminghausen. That left front valve on a RHD 6.3 is tedious - 7 steel pipes and two bolts to line up. The other two are straight forward. Now I need some 6mm ball joints from J.W.Winco to replace the substandard "plastic" ones to finish the job properly!
Art
|
|
|
|
6.3Nut
|
|
2/15/2016 9:35 PM
|
quote:
Originally posted by Art Love
OK. Make sure the pipe flare nut is not cross threaded, then try to re-tighten it. If it is properly tight and still leaking, then you need to look at the flared end of the pipe to see if it is damaged and to check that the seal washer in the brass fitting at the E connection of the valve where the end of the pipe seats is not missing or damaged. Again, that does not involve taking the whole valve off the subframe. You may need to use a small mirror to see the seal washer.
Art
Well Art, I had to take the valve off, the seal looked OK through the mirror but since the flare end was spot on so I figured the problem's got to be with the seal, and sure as day light the seal was lose so I put in a new one and now with just a slight nudge on the flare nut I have a good seal - Thanks for your input. There cars and then there are BABIES! 1969 Euro Model 10901812000931
|
|
|
|